Pages

Thursday, February 21, 2013

It's All Knitting All The Time

I have a new habit. It may well be an addiction.

It all started when I had my surgery and I took to crawling into bed after the boys went to bed to sit and knit. Then I started listening to audiobooks while sitting in bed knitting. Now I'm addicted. It's relaxing, it's peaceful and after a few hours of knitting all I have to do is turn the light off and go to sleep (plus it's a whole lot warmer in that part of the house compared to the living room). Win win. So I've got a whole lot of knitting done over the last few weeks!

First on the list is my Lingonberry Shawlette. I raided my stash for some Koigu Painter's Palette that I bought back in about 2006. It's been tucked away forever not sure what it wanted to be. I think it's pretty happy with what it's become! I know I am. This is the first triangular shawl of this sort that I've made. I am sure it won't be the last. In fact I've already been scoping out other patterns for my sock yarns that are too pretty to be hidden by shoes!

Photobucket Pictures, Images and Photos
A new pretty for me!

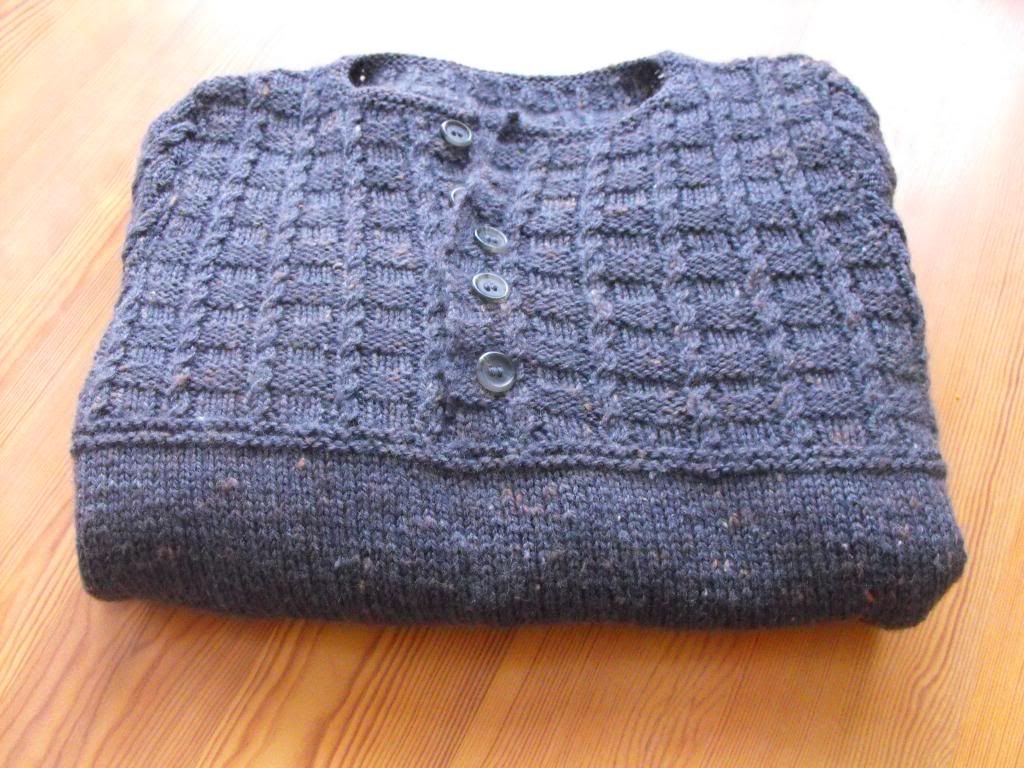
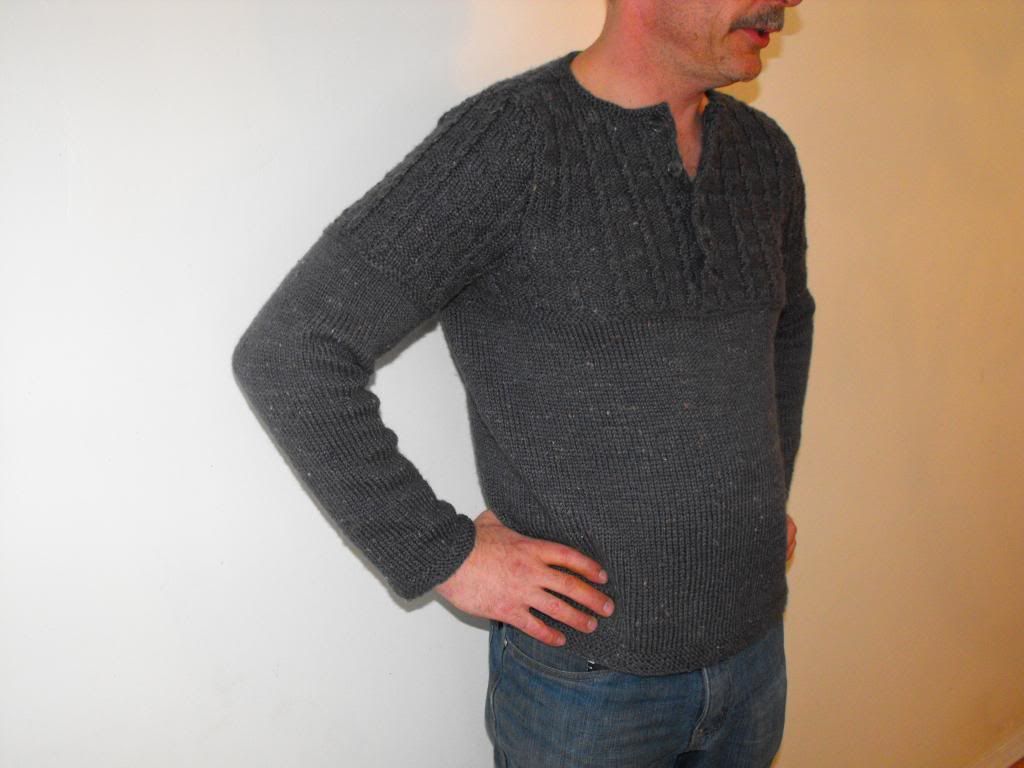
After Lingonberry was finished I shifted gears. I had ordered some tweedy yarn from Elann to make (BF)G a sweater. I was planning it as a surprise for next Christmas and thought I'd get a head start. Turns out I suck at surprising him. He's been getting lots of wear out of it! I'm especially proud of Guston because it's the first time I've really taken care to swatch and block properly. It's amazing what a difference it makes. But the rest of you knitterly people already know this don't you? I swear though, I've turned over a new leaf. I really, really love this sweater on (BF)G!
Photobucket Pictures, Images and Photos
Look at the fit!

Photobucket Pictures, Images and Photos
Close up of the cable pattern

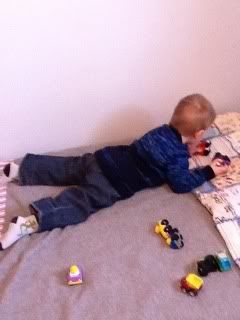
Moving right along... I'd initially started Guston as a knit along with the Knitting for Boys group on Ravelry, but since I finished within two weeks of starting what was to be a year long KAL I figured in for a penny in for a pound and jumped into their monthly KAL for February, casting on for a Greyson pullover for Baby Boy. I LOVE this pattern. I used some beautifully soft Punta Merino Perfection that was in my stash and bought a skein of Berroco Vintage for the contrast. He's two. Washability and softness were of utmost importance for choosing his yarn. He really likes his new sweater! (Not the greatest pictures - this is what you get taking pics on an old iPhone on a gray, cloudy morning in a somewhat dark room - but you get the idea)

Photobucket Pictures, Images and Photos
Modeling Greyson

Photobucket Pictures, Images and Photos
Lounging about

I learned a new technique for casting off the neckline that was amazing both in it's simplicity and result. If you need a stretchy cast off for any reason I urge you to try out Jeny's Surprisingly Stretchy Bind Off. Cat Bordhi has a great YouTube video demonstrating it! Go take a look. It will change your knitting life.

Little Toddler Man has sweater envy. I've promised to knit him Hotshot by the same designer as Greyson. Actually, what I rashly promised was to knit him, Baby Boy and their Waldorf dolls all their own Hotshots. Clearly I'm insane. I haven't started yet because I need to pop into my LYS in the city for yarn and I haven't been to the city in a few weeks. Sunday looks like it'll be the day. Every time LTM sees me pull out my knitting bag he asks hopefully, "Is that for my sweater???" and is crestfallen when I tell him not yet. Soon little man. Soon.

So while I wait I keep knitting.

My friend Jen deployed at the end of November. A group of us from our mama's group decided to do a little KAL with her while she's overseas and my sock pattern Follow the Leader was chosen. I started them, but then put them aside to do my Christmas knitting, then picked them up again in the new year, didn't look at my notes and completely messed them up. Rather embarrassing to admit I messed up my own pattern, possibly more embarrassing to admit in a fit worthy of a two year old's tantrum I ripped them right back to the beginning, rewound the wool and tossed the ball back in my closet. Not my finest moment...

I took the yarn out last week, cast on and had them almost finished in time for G to come home to visit last weekend. She asked eagerly, "Are those for me?!?" I said an emphatic "NO!" intending to keep them all for myself, but by the time I was grafting the toe I decided perhaps if I gave them to her I wouldn't lose any of my other hand knit socks. She's a shameless sock thief. You have to watch your hand knits carefully around her...

She graciously accepted my offering and I've not noticed any other pairs missing so it worked out well for me.
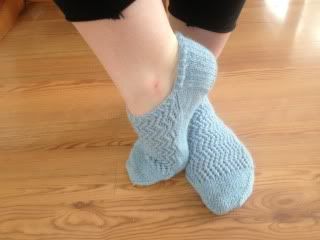
Photobucket Pictures, Images and Photos
I'll admit I do like that G appreciates hand knits so much ;)

I've still got a few more days to wait until I can get the yarn for the Hotshots so yesterday I grabbed a ball of sock yarn out of my stash and cast on a new pattern I've been thinking about. It's another pair of ankle socks, we'll see how it goes. I'll have to keep you posted.

Maybe one of these days I'm going to have to put the needles down, turn off the audiobook and spend some evenings with my sewing machine. I've got three baby gifts cut out and ready to be sewn. I really should get on them before the babies they're meant for are graduating high school.

So that's what I've been up to lately. How about you? Are you busy crafting your winter evenings away?
Sunday, February 17, 2013

The Sweater of Doom Is Done!!!!!!

Once upon a time, long ago and far away (it was in the late 90s) I bought a pattern book full of gorgeous Lopi sweaters. The first pattern particularly caught my eye. It was a beautiful, cozy hooded pullover (and no steeking involved - huge bonus points for that!!) But it never got knit. I could never seem to justify the purchase of so many balls of yarn when I purchased the book. I was a single mom trying to raise three kids on a telemarketer's salary of $6.00/hour. Extras for me just weren't to be had. Then over the years I sort of forgot about it. It was still there in the back of my mind, but it was definitely on the back burner for "some day".

Then a few years ago my good friend Kristy lost her beautiful mama suddenly. She and her brothers rounded up the knitters they knew and told us to please come over take what we wanted from their Mom's amazing stash of yarn. Their Mom was a prolific knitter and a lovely person. I was honored to have the yarns that she had chosen with such obvious care. I suddenly found myself with a windfall of Lopi yarn and that pattern book that had been quietly whispering my name for over a decade began shouting at me and I decided to cast on in June... Of 2010.

The sweater was fraught with disaster. I cast on in the wrong colour, I made mistakes, read charts wrong, had a reaction to the yarn at one point just to mention a few of it's trials and tribulations. Here is an excerpt from my project page on Ravelry dated May of 2011:

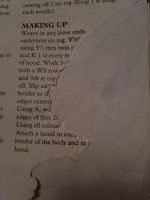
"This sweater is going to be the end of me!! I started working on it again this week and was almost done. Then the dogs got my pattern and ate the part I need. Now what the heck am I supposed to do. Oh. And size wise. It would have fit me better if I was oh… you know… about 5’2” instead of 5’6” and while we’re at it lets just say I’m about 30 lbs to heavy for it too. ARGH!!!!!!!!!!!!!!!"

Photobucket Pictures, Images and Photos
This was all that remained of my pattern

At that point the blasted thing got shoved in the closet. I had no idea what to do with it. No one else had it listed on Ravelry at the time (there's one other now) so I was stuck.

Then a little while back a thread popped up from a poster on Ravelry wondering how to replace her pattern that her dog had eaten. Someone suggested contacting the company or designer. D'uh. How had this not occurred to me. I sent off a quick email to Istex one morning explaining my doggy tail of woe and within minutes had an email back with a PDF of the pattern! Really. How did this easy solution never occur to me??? I was so happy that I was going to finally get this wooly monkey off my back.

Not so fast... This, after all, did not earn the name the sweater of doom for no reason. There I was, blithely zipping along through the knitting of the hood when I stopped to admire my handiwork, ready to give myself a congratulatory pat on the back. I looked. I cocked my head to the side, I squinted, I peered, I closed my eyes and opened them again, willing it not to be true. Alas. It was right there plain as day. I'd started the bloody thing two incredibly noticeable stitches off center. Rip, rip, rip. Seven or eight inches back I went.

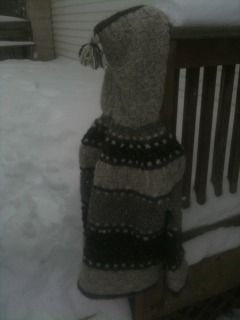
I'm thrilled to say it's done now. Its been done for a few weeks actually, but I've not thought to write about it until now because, well, I'm still a little bitter towards what should have been such an incredibly easy pattern so thoroughly kicking my knitterly behind. Also it took forever and a blooming day to weave in the six bajillion ends.

Photobucket Pictures, Images and Photos
Finally finished on a blustery cold winter day 2 1/2 years after first starting

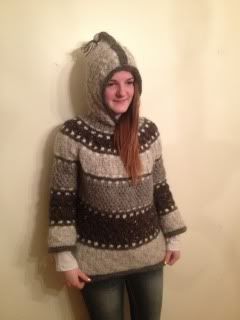
G, who is considerably smaller than me has claimed it happily as her own and the pattern book has been stashed on my bookshelf (possibly never to see the light of day again - did I mention I'm a touch bitter?)

Photobucket Pictures, Images and Photos
Hmmmm. The curse continues... Those sleeves are a bit short aren't they?

Photobucket Pictures, Images and Photos
My girl does love her hand knits though!

Knitting disasters like this can really shake a crafty gal's confidence, but just like falling off a horse (which I've come close to doing but thankfully never actually have because that sounds like it could really hurt...) you just need to get back in the saddle again. I have and I have had some wonderfully happy results in the last few weeks. It feels good. I'll have to tell you about them another day though. I think Little Toddler Man and Baby Boy may be dismantling the furniture or re-wiring the house right now. They are just far too quiet to be up to anything good. Must dash and investigate!


Sunday, February 10, 2013

Have Wet Bag Will Travel

A wet bag is a great idea. When Baby Boy was in cloth diapers I kept intending to make some to have on hand, but I kept forgetting (no idea why, just did) so there were a few times when I was stuffing a wet diaper in my my bag hoping no nastiness would leak out during the rest of outing. Other times plastic bags sufficed, but I think I would have liked a wet bag. Now that both LTM and Baby Boy are potty trained I should still should have at least one or two for those rare accidents when we're out and about. It'd also be handy for wet swimsuits!

When I set about making a gift for a cloth diapering mama friend of mine's new baby I started with the obvious choice. I made her little munchkin one of my one size pocket diapers. I hummed and hawed as to what to send with it. Finally settling on a Snappy Wipe To Go - an awesome little PUL outer washcloth designed by my friend Christine. (These little cloths are great. Took me all of about 15 minutes the other morning to make one for the boys' lunch bag before we headed into the city for the day. Go check it out. I highly recommend it!)

Then I thought why not make it a whole "diaper change to go" package and include a wet bag. There's loads of tutorials online, but I decided to do my own version, mostly because I didn't feel like spending all my precious crafty time searching google for exactly what I wanted.

Photobucket Pictures, Images and Photos
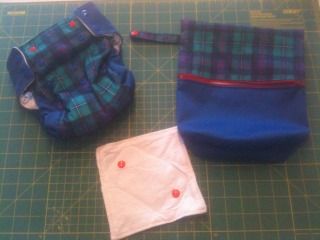
O/S Pocket Diaper, Snappy Wipe to Go (pardon it's wrinkles my iron died mid project) and wet bag

So here it is! Grab your supplies, and get sewing! It'll whip up in no time! I'll give you two versions for the hanging loop. The first one will have snaps, the second one will be a plain loop. I'll also show you two different bottoms for your bag! Hey! And guess what. Because I'm doing two variations after I'm done today's tutorial I'll finally have a wet bag for my very own! Wheee!

WET BAG SUPPLY LIST

Ballpoint needle
Polyester thread
Sewing machine
Polyresin snaps / snap pliers (optional)
Iron - low setting, no steam
1 zipper (at least 23" length - longer is ok, you can trim it down to fit)
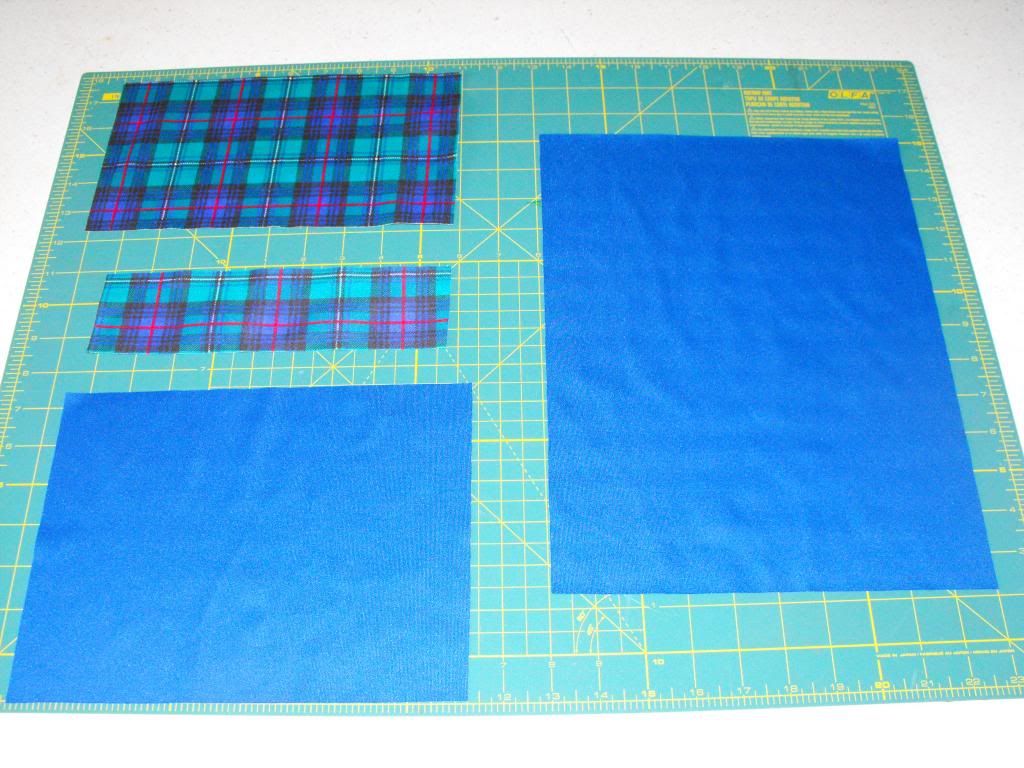
1 piece main colour PUL cut to measure 13 1/2" tall x 10" wide
1 piece main colour PUL cut to measure 7 1/2" tall x 10" wide
1 piece contrast PUL cut to measure 6 1/2" tall x 10" wide
2 pieces contrast PUL cut to measure 2 1/2" tall x 4 1/2" wide (version A snapped loop only)
1 piece contrast PUL cut to measure 2 1/2" tall x 8" wide (version B non-snapping loop only)

NOTES:

1) Just a quick note about dimensions of the front pieces. This is a great stash buster project so feel free to make your contrast piece narrower if you'd like to suit your fabric. (Remember, a narrower contrast would also change the placement of the zipper closer to the top of the bag.) Just simply adjust the bottom main portion to accommodate the smaller contrast. Your contrast and main pieces need to equal the height of your longer back piece. Have fun and get creative!

2) Pins and PUL are not friends. Pins will leave holes that can lead to leaking. If you feel you need to use pins go ahead, just keep them within the seam allowance!

3) Some PUL can be "sticky". If you find this to be a problem you can try a few tricks. Try dusting your PUL with baby powder, using a layer of tissue paper (just tear it off when you're finished), or use a Teflon foot if you have one (I've never done any of these although it was close with my elephant PUL. Fortunately the green wasn't sticky so I just flipped everything over and sewed with that side facing up and everything went fine!)

Photobucket Pictures, Images and Photos
You should have a collection of pieces that look something like this!

INSTRUCTIONS

Step 1 Version A - Preparing the Snap Loop

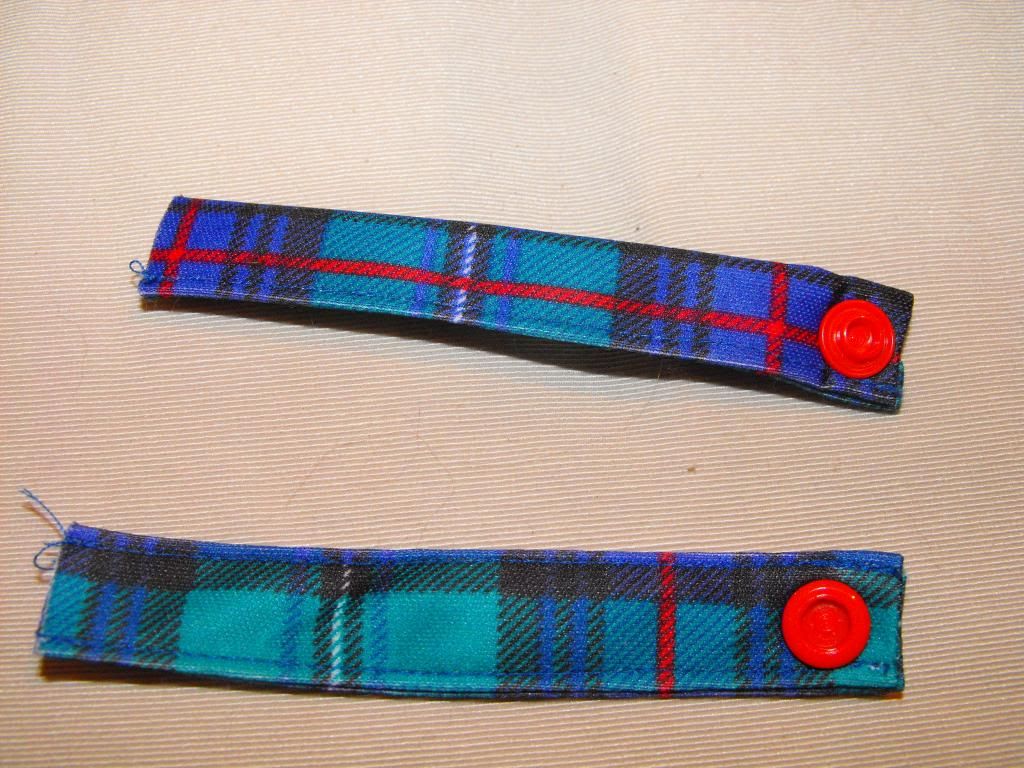
Fold one 2 1/2" end to the wrong side of fabric by 1/4" then fold 1/2" in down each long side of loop piece to meet in the centre. Next fold entire strip in half so that you have a long, narrow strip. Carefully press using an iron, on a low setting with no steam. Edge stitch down each long side. Repeat for second loop piece. Apply snaps to finished end according to manufacture's instructions so that the caps face the outside and the socket and snap face inside(the ends that have raw edges will be sewn into the side seam of your wet bag so no need to finish them). Snap the two strips together, align the raw edges and baste together if desired. Set aside.

Photobucket Pictures, Images and Photos
Preparing the snapped loop

Photobucket Pictures, Images and Photos
Two halves of snapped loop ready to go

Step 1 Version B - Preparing the Plain Loop

Fold 1/2" in down each long side of loop piece to meet in the centre. Next fold entire strip in half so that you have a long, narrow strip. Carefully press using an iron, on a low setting with no steam. Edge stitch down each long side. Fold strip in half so that raw edges on the narrow end line up. Baste if desired and set aside.
Photobucket Pictures, Images and Photos
Plain loop ready to go

Step 2 - Preparing the Bag Front

In this step you will insert the zipper. This is likely the trickiest part of making your wet bag!

If you need to cut down a larger zipper, simply stitch and backstitch across the zipper tape at the measurement you require, then trim excess leaving a slight surplus. (Note : this works for light nylon or plastic zippers. I wouldn't try with heavy plastic or metals zippers. You will break your needle. Trust me on this.)

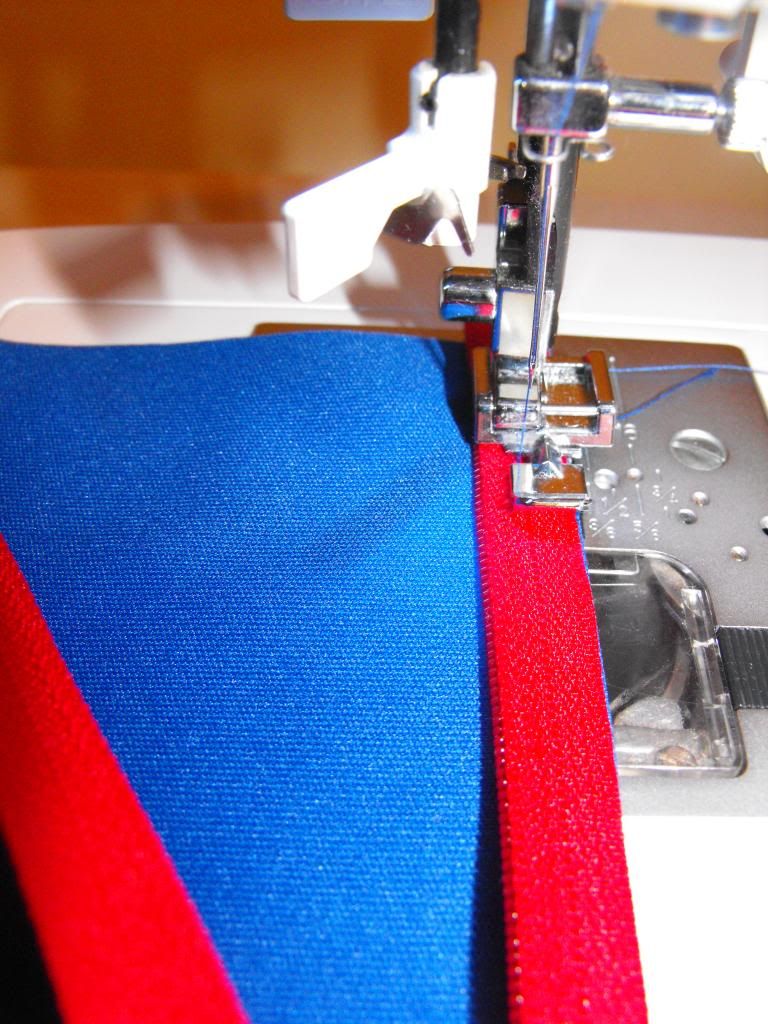
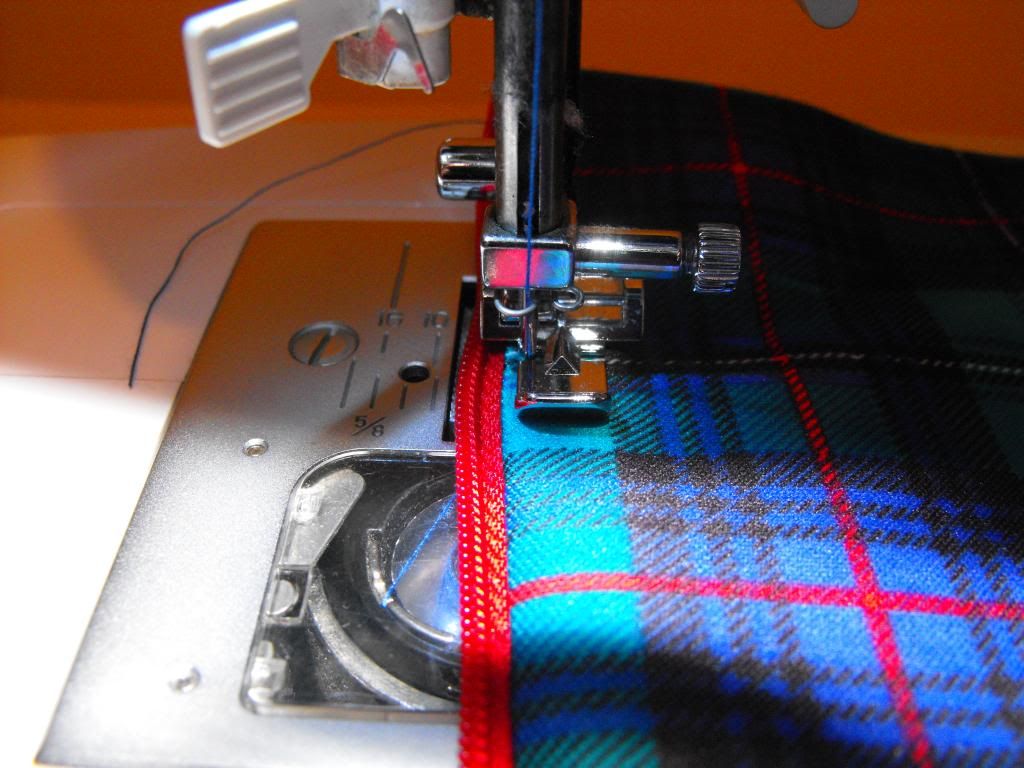
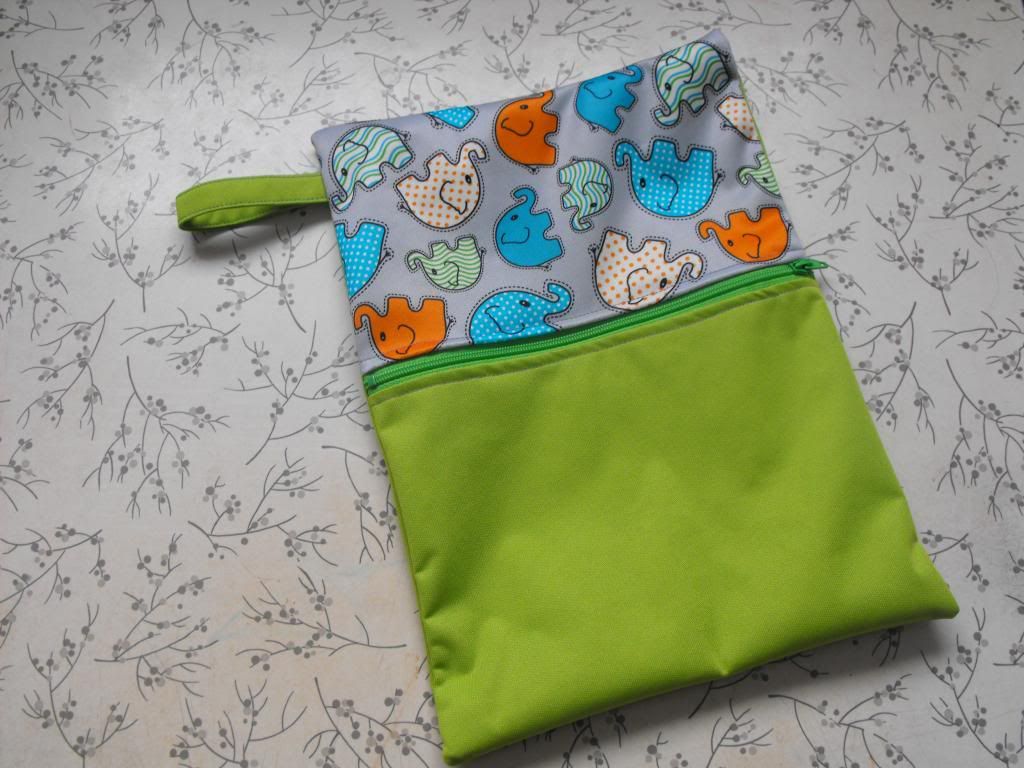
Place the right side of the zipper tape face down so that the edge of the tape aligns with the edge of the shorter main colour PUL piece. Stitch carefully close to the zipper teeth using a zipper foot on your machine. Flip zipper tape and seam allowance of PUL to the inside. Lightly press - remember to use a low setting and no steam if using your iron - or finger press, then topstitch. Repeat process for the contrast PUL piece. Baste down the sides of the PUL where the zipper ends. Your front piece is now complete. (*just another quick note - it really doesn't matter which side your zipper opens from. I inadvertently did one of each, but I think if you're planning on hanging your bag on a hook, the opening would be better on the opposite side from the loop like in the elephant bag)

Photobucket Pictures, Images and Photos
Attaching the zipper

Photobucket Pictures, Images and Photos
Edgestitch on the right side

Photobucket Pictures, Images and Photos
This is what it should look like

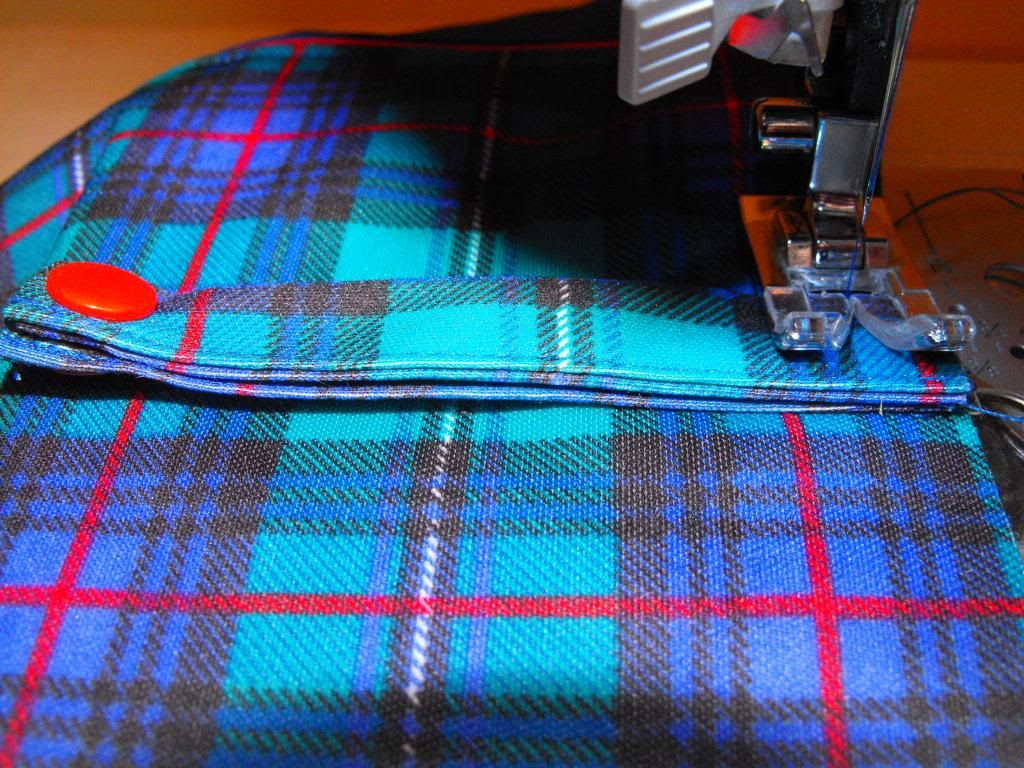
Next baste your prepared loop so that the raw edges align with the long edge of your newly finished front approximately 1 1/2" from top of contrast portion of front, right sides together, with the loop pointing towards the centre of the front piece. Baste.

Photobucket Pictures, Images and Photos
Basting the loop onto the front piece

Step 3 - Assembly of the Bag

Open zipper partially. (This is so you can turn your bag right side out - you do not want to forget this step. It will lead to frustration and the need for your stitch ripper)

Place prepared front and remaining PUL piece right sides together. Stitch around all four sides using a 1/2" seam allowance. Reach into the bag through the open zipper and flip your bag right side out. You're done! Wasn't that easy?

Photobucket Pictures, Images and Photos
Stitch around the entire outside of the bag but make sure you've left the zipper partially open before you start

Photobucket Pictures, Images and Photos
Handy dandy wet bag all finished

Variation

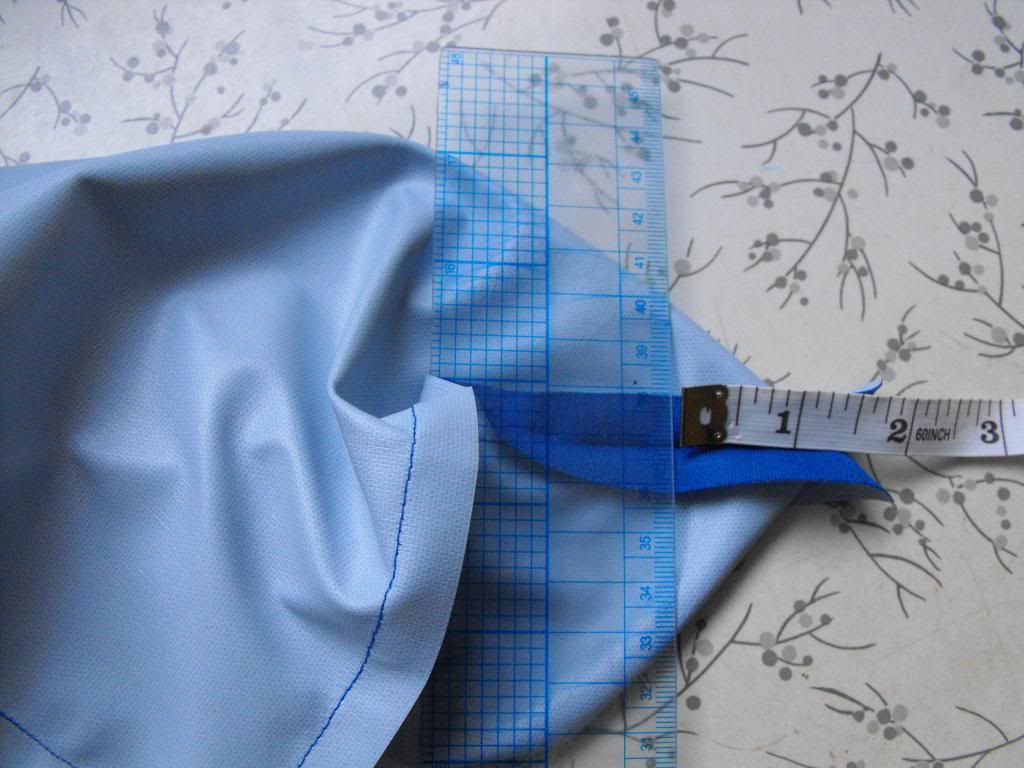
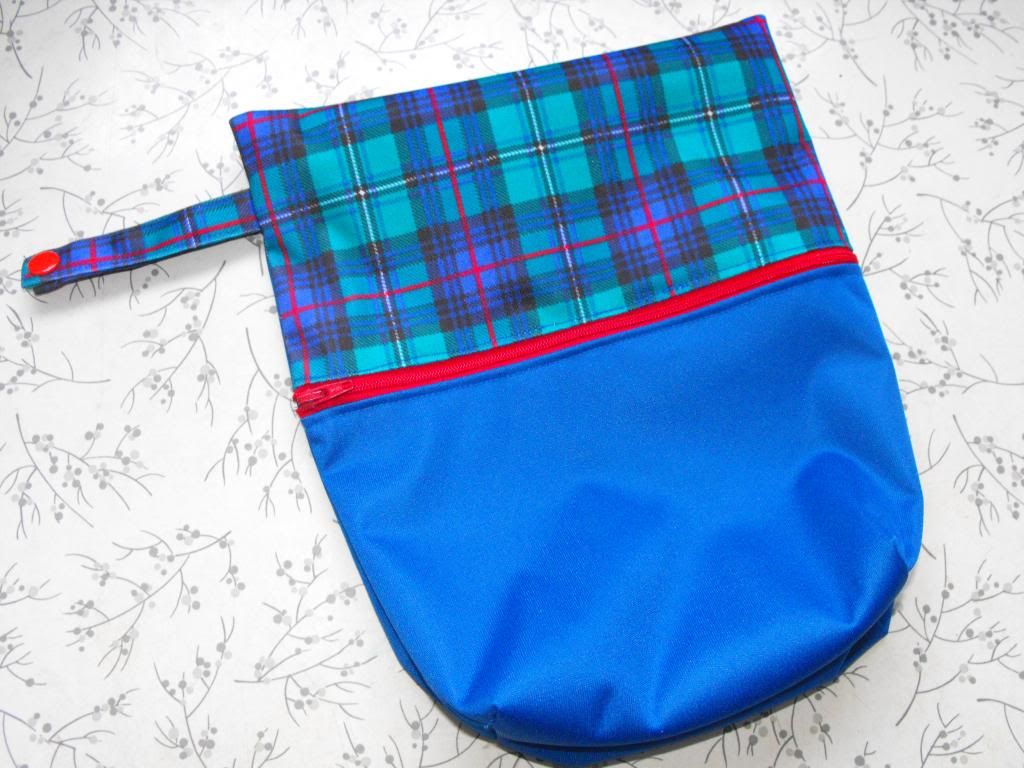
If you want to get fancy on the bottom of your bag let's do something with those corners to create a flat bottom! With your bag still inside out, pinch the corner together, lining up the seam allowances, to form a triangle. Measure 1 1/2" from the edge and draw a line across from side to side. Stitch along the line and trim excess. Repeat for other corner. Now turn your bag right side out. You're finished!

Photobucket Pictures, Images and Photos
Pinch the corners together and mark 1 1/2" from edge then draw a line from side to side forming a triangle

Photobucket Pictures, Images and Photos
Stitch along the line and trim excess

Photobucket Pictures, Images and Photos
Voila! Finished!

Now, quick! Go stash it in the diaper bag or your purse so that you don't get stuck at Kindermusik class gingerly stuffing a very wet, slightly dirty diaper into your purse while you hope nothing leaks onto your wallet, keys or gum. Or maybe those sorts of things only happen to me...