Thursday, August 29, 2013

Greyson 2.0

A couple weeks ago I told you that I was knitting a replacement sweater for the one that fell on hard times at the hands paws jaws of Bella the Sometimes Very Bad Dog.

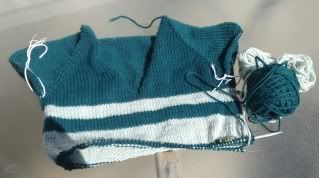
I'm very happy to say it's DONE!!!!! I'm also very happy to say I love it. More importantly, Baby Boy loves it! What he did not love was trying it on earlier today so I could take a few photos. Granted it was a ridiculously muggy +30C when the pouring rain had stopped and the sun came out. Hey! A knitter's got to do what a knitter's got to do right? I needed those pics for my Ravelry project page. Don't worry. He was only dressed in his jeans and long sleeved wool sweater long enough to snap two pictures, then I brought his sweaty little self in and stripped him back down and replaced his winter attire with more appropriate shorts and tee. Besides, I'm certain I can't be the only knitter who utilizes this particular brand of torture. He really is quite pleased with the sweater. Especially since he did pick out the yarn for it "all by mine self". I'm also feeling pretty happy that I finished well within the time frame of the Luvinthemommyhood Summer Sweater KAL. There's still almost three weeks left in the KAL. I might even be able to get another sweater in for it. We'll see! But back to Greyson 2.0!

Greyson, by Julia Stanfield, is such a fantastic pattern. The classic V-neck knits up really quickly top down and is designed for several different weights of wool to suit your fancy. I did Baby Boy's in worsted weight Berroco Vintage (the darker green) Valuruguai Supernova (the pale grey green). Both yarns are machine washable and wear really well. Perfect for a rough and tumble little fellow like Baby Boy!


In other knitting news, I finished my Miette cardi by designer Andi Satterlund. I had ordered two sets of vintage buttons because I couldn't decide which I liked better and had to wait for both to arrive before completely finishing it. I'd show it to you now, but I can't as I haven't taken any photos of it yet. It's way to hot to be parading around in a short sleeved cotton cardi while someone snaps photos... That would be all kinds of crazy. Ahem... (don't tell Baby Boy I said that - I have a feeling he wouldn't appreciate my suitable sweater weather double standard...)

That's about it for me in the knitting department these days. Now you'll have to excuse me... I'm dying to cast on a swatch for Andi Satterlund's new cardi pattern Hetty!  I absolutely adore her patterns with their retro vibe and feminine details! Cross fingers my yarn is going to work with it! I'm hoping to use some stash yarn I've been hoarding for a few years now!

Wednesday, August 14, 2013

The Rose Petal Bag

A little while ago, Anna, from Charmed Liebling put out a call for testers. I'm not sure that I so much as took the time to blink before offering. I do love bags and her's all look wonderful, so I was pretty excited about the opportunity!

Shortly after I got an email with a pattern to try out. It did not disappoint! What a fun little purse and great project! I decided to challenge myself to use as much "stash" as possible for my bag and in the end was able to do it except for needing a magnetic snap. I almost always have a couple on hand but for some reason this time I was out. A quick trip to the fabric store in town solved that problem and I set to work.

I used a red linen (leftover from a pair of maternity pants I'd made when I was expecting Little Man) for the outer fabric, a fat quarter I got in a swap with one of my Ravelry groups for the lining, fancy d-rings I've had kicking around for at least eight years for the handles, the zip I'd bought for my dress that I then decided to not use and a remnant from I can't even remember what for the pockets and rose petals. Stash busting at it's finest wouldn't you say?

The purse took no time to put together. A snippet of time hand sewing the petals on while the boys played, a bit more time at the machine after they'd gone to bed and a wee bit more the next day while they wreaked havoc played in the sewing room. The pattern itself is incredibly detailed, with lots of pictures to guide you along. Any mistakes I made were solely mine, not a problem with the pattern (like absentmindedly cutting out my flap lining the wrong way, and because I was using a fat quarter didn't have room to cut a new one so had to piece two bits together and seam it. Ooops!)

I'm really pleased with the end result! With both an inner zip pocket and a slip pocket it's a great little bag that will hold the necessities - well maybe not all the necessities. The fruit snacks, hot wheels and superheroes may have to stay home on occasions when I use my Rose Petal bag. Ha ha!

When I went out the other morning to take a few photos in the beautiful sunshine I noticed my bag was the same colour as the ripening chokecherries. I thought it the perfect background - and as an aside, a little tidbit of trivia for you, chokecherry trees are part of the rose family. So even more fitting a place for a photo!
The Rose Petal Bag by Charmed Liebling

A closer look at the details

I love this lining fabric - it coordinates so nicely with the linen

If you're looking for a new purse with lovely detail give this one a try! It won't disappoint you! You can purchase the pattern over at Anna's shop on her site, Charmed Liebling. She's also blogged about the bag as well!

And speaking of chokecherries, I've got to dash. We're in the midst of boiling down and straining chokecherries today for jelly and syrup - my canner beckons!

Monday, August 12, 2013

Greyson - Version 2.0

Remember last winter I knit Baby Boy a sweater?  I was so very pleased with his Greyson.  It was such a great pattern, it fit really well and he loved it.  It was soft, cozy and comfy and it looked great on him.

Greyson Version 1.0
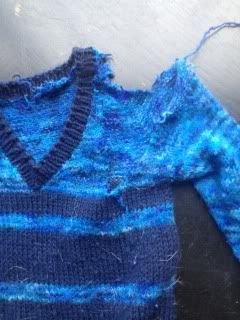
Well since then a few tragedies have befallen his sweater.  The first being in the spring I washed exactly as I had several times before, on gentle, in the machine.  Only that time instead of coming out perfect as usual, it came out ever so slightly felted in the Punta Merino Perfection variegated parts.  I wasn't sure why, but wasn't too worried.  He could still wear it, it hadn't suffered that much damage, the Berroco Vintage stripes were still soft and nice.

Fast forward several weeks.

We had a cool spell for a few weeks recently here on the prairies. (Seriously, summer vanished completely for a bit!) I thought it would be a good time to pull out the Greyson, but it felt sort of crisp and crunchy for lack of a better description.  A friend suggested a soak in hair conditioner might do the trick so into the sink it went for a 45 minute bath. It softened up beautifully. Even the slightly felted parts seemed to relax a bit.  It was almost back to it's former glory! I was so excited.  I set it on the kitchen island to dry, but then at supper time shifted it to the top of the dog's cage.  You know where I'm going with this don't you...

So sad :(
Yep! Unrepairable tragedy.  I could've cried. (actually I may have cried.  I also am pretty sure I said more than a few bad words). Really it's not the dog's fault.  I totally forgot I had left it there and the next morning decided to go to the loo first before letting Bella out of her cage.  Bella disapproves of anything being done before being let out of her cage, so she took that quick opportunity to haul the towel and sweater in through the bars.  The towel was completely unharmed.  Why oh why couldn't I have a dog that preferred towels to hand knits?????

Baby Boy was pretty sad too, so I promised I would knit him a new one, he just had to wait until we would be able to get to the city for some new yarn.  He did find something he liked in my stash for the stripes, but we had nothing he liked enough for the main colour.

We made a quick trip to Wolesley Wardrobe the other day and he picked out his yarn.  It was kind of cute. As I plucked yarns off the shelf suggesting this one or that he was rather non-committal.  Then I thought I'd found the perfect yarn. Oh it was a gorgeous shade of blue-green.  I showed it excitedly to Baby Boy, who flatly said, "No. I don't want that one. It's not the one I want." Then he picked another colour off the shelf and said emphatically, "This one," as he clutched it to his chest, nuzzled his face into it and started walking to the front of the store.  The front door was open and I guess he felt his job was done and I stopped him just before he headed straight out of it, then redirected him to the cash desk where he proudly put his selection up on the counter.

We paid for our yarn and headed out.  Every time he looked at his yarn he felt the need to remind me that it was his.  "That's mind.  I choosed it all by myself.  It's for my sweater." I guess in case I might somehow forget.  He also asks several times a day if his new sweater is ready. (Slave driver!!)

So I'm knitting as fast as I can whenever I get a chance.  I've decided it works well, too, for the Luvinthemommyhood Summer Sweater Knit Along, where Shannon encourages us to not forget our knitting in the heat of the summer, but to work on sweaters so that they're ready to wear come the cooler temperatures of fall. (Or in the case here on the prairies - what is supposed to be summer although to be fair, this week summer has suddenly reappeared after several weeks of absence!) Anyways, Greyson fits the bill, it is a sweater and has full length sleeves!  Whoot!  I really enjoy Luvinthemommyhood KALs.  Everyone is so friendly and encouraging, it's really motivating!

Moving right along with Greyson Version 2.0

Monday, August 05, 2013

In a Pickle!

Or at least up to my eyeballs in pickles...

For a few years now, a very generous soul at (BF)G's work has been supplying us with awesome homemade dill pickles (and lately salsa too - yep! We've got it made!!) They're delicious as only homemade pickles (and salsa) can be. Mmmmmmm. Yum.

A long time ago I used to do a lot of canning. Jams and jellies and pickles - dill, beet, something called "bucket pickles" and even a most unfortunate crabapple pickle (I was trying to do sweet canned crabapples like Mom always had... You'd think the vinegar in the recipe would have clued me in. Alas...). Anyways, that was a lifetime ago and I haven't done much of anything of the sort in years.

Last year after getting a pile of second hand canning jars and a canner I thought I'd ease back in, so I made jams, apple butter and apple pie filling, but I really wanted to get back to pickles. (BF)G must have mentioned it to our pickle supplier and she offered to pick up some pickling cukes at a local Hutterite colony when she got her's. I agree (although a bit hesitantly because I figure that means the end of her pickles coming our way), because it would be great to have a pantry full of our own. So for $25, I got a HUGE 20lb box of cukes, plenty of dill, and the best part? She had tucked her own recipe inside. I had stopped by Mom's earlier in the week for some jars - I had either 500ml or gigantic old (with glass lids) jars that didn't fit my canner - so having all my supplies gathered, yesterday morning I decreed it to be pickle making day.

Wow! What a lot of work. I was pooped! I'm sure I could have streamlined my flail and fumble about the kitchen, making mad dashes out to the garage to scrounge for more jars to sterilize, frantically peeling and cutting more garlic and making more brine, running between the kitchen and the window to make certain the boys were still in the yard and not performing any death defying stunts and generally just resembling a chicken sans head. it wasn't pretty, but hopefully it was worth it. We'll know in a few weeks. (oh how I hope they are as tasty as Carol's!!!)

There is something so incredibly satisfying about hearing those snap lids snap as they cool and then standing back to admire the fruits (or in this case pickles) of your labour.

Photobucket Pictures, Images and Photos
Holy Smokes! What have I got myself into????

Photobucket Pictures, Images and Photos
Pickling cukes take a heck of a long time to wash!

Photobucket Pictures, Images and Photos
Splish, splash taking a boiling water bath!

Photobucket Pictures, Images and Photos
Yum! Pickles for winter!

Hopefully I'm not divulging some ancient family secret recipe here by sharing the one I used, but I'm pretty sure it's fairly standard.

Garlic Dill Pickles

Pickling cucumbers - gently scrubbed and washed
Garlic - peeled and bigger cloves, chopped
Heads of dill

Brine:
21 cups water
7 cups vinegar
1 cup pickling salt
2 cups sugar

Mix all ingredients in a pot and cook until salt and sugar are dissolved. (make more brine as needed)

Meanwhile pack garlic, dill heads and pickling cukes into hot sterilized jars. Pour brine over top, seal jars and process in a boiling water bath until yellow.

*********

Pretty straightforward, really.  I took a look at one of her jars to see how much garlic and dill she used and saw there were about five chunks of peeled, chopped garlic and two smaller heads of dill. I processed mine for 10 minutes in the canner.  Oh! And to do the brine I had to make only half at a time because I didn't have a pot large enough to fit it all at once.  I started out with 20 lbs of cukes and ended up with about 21 litres of pickles. The brine recipe was sufficient for about 14 jars.


Tuesday, July 30, 2013

A Honey of a Blouse

I mentioned in my last post that I did finish the Honey Blouse from Make it Perfect. I fell in love with the pattern a few months ago when I had stumbled across it on another sewing blog. It looked like it would be just the kind of top I could easily live in. I ordered it from Pink Chalk straight away and then started my search for fabric. With (BF)G's help, I finally settled on a cotton lawn with a bright and abstract print on white background that I found at Fabric.com.  Once pattern and fabric had both arrived I was so excited to dive right into sewing... and then I read some reviews of the pattern that weren't really enticing, but still I thought, can't be that bad and I really loved the look of it, so I opened the pattern up, ready to trace and set to work and understood the basis for the unfavourable reviews.

For a full priced pattern there's a lot of work to be done.  Pattern pieces that need to be traced together are printed back to back on smaller paper and then there are several pieces that need to be just cut to measurements with no pattern piece at all.  I can understand that it cuts back on printing for the publisher of the pattern, but at $12, I expected a little more.  I tossed the instructions aside after about the first sentence as they just weren't reading well to me - although that could just be me being finicky. I have to say in all honesty I really did not enjoy the making of this pattern. From start to finish I was annoyed with it.

My whole disgruntlement could really just be me.  After sewing my Jamie Dress and thoroughly loving the whole process of it, maybe my expectations were just simply set too high.  The Sis Boom pattern, as you may recall, went together like a dream.  The instructions were clear and thorough not too mention intuitive.  I just wasn't getting that feeling from the Honey Blouse.

Despite the annoyance with the pattern, I am really happy to say I did end up with a blouse I love.  It's comfortable, fits pretty well (although a touch roomy in the hips) and I have worn it several times.  Definitely worth the frustrations I had making it.  I can truly say I love my Honey Blouse now that it's finished and I'm so glad I persevered!!

(photos once again curtesy of Little Man)

Photobucket Pictures, Images and Photos

Photobucket Pictures, Images and Photos

Up next in sewing I have a little project to finish for someone, then possibly another warm weather top for myself and a new pair of warm weather pj pants for (BF)G.  After that it may have to be another set of jammies for the little boys because I'm getting tired of having to wash the digger ones every second day.  (That's all they want to wear and oh the anguish when they need to be washed as you know, clothes sometimes do...). In between that the Christmas knitting continues as does work on my Miette Cardi.

Saturday, July 27, 2013

Kid's Clothing Week Round Up

Photobucket Pictures, Images and Photos

Last week was Kid's Clothing Week. KCW means one thing for me usually. I make grandiose plans to sew for the boys all week and in reality, fabric does not get cut out, my machine does not get turned on and nothing gets accomplished.

I was determined to be successful this time. So I didn't sign up.  I figured signing up would alert the gods of sewing that I was planning on participating and that would mean I would be dead in the water from that moment on, they would shut me down instantly somehow.

I set the bar low for myself.  Instead of making a list of five or six items I made a goal of sewing two pairs of pyjamas. One for Little Man and a matching set for Baby Boy. Easy Peasy.  How hard could it be to finish on deadline?

Before diving into the kid's sewing though I really wanted to get my Honey Blouse done first because I was planning on wearing it to a party last weekend that I ended up not able to go to in the end anyways (thanks to my 42 year old back that likes to think it's 90), so I got a bit of a late start to the kid's projects to begin with.

I am happy to say I did finish!  Last Thursday. Only four days late.  I call it a win.  Whoot!!!!!! Success at last. That so rarely happens for me with KCW. Ok, ok. I realize KCW is supposed to mean at least one hour a day for that particular week, but whatever. I have lower standards... And after all, better late then never (or not at all), right?

I had the fabric and the patterns picked out well in advance.  I decided to use a vintage Simplicity pattern for Little Man that I used to use a lot for J and N when they were little.  (Vintage.  Ha ha! It's c1974.  That would be three years younger than me... Does that mean I'm vintage too?) I could make that pattern in my sleep I've done it so many times before and it makes nice comfy jammies.  For Baby Boy I used my standard go to Kwik Sew pattern that I've also made about a billion times now, and just altered it to match Little Man's.  The fabric I had picked up early in the spring and have had sitting in my stash waiting to be used for months. I made a size bigger than they really needed in hope that since summer is half over already they will still be able to wear them next year. Of course this likely guarantees growth spurts of epic proportions over the winter months.

Photobucket Pictures, Images and Photos

I was provided with motivation to finish in the manner that about once every five minutes Little Man would ask if his digger jammies were finished yet. Once his were done, he asked about once every five minutes if his brother's were done. (I had told him he had to wait for Baby Boy's to be finished or it wouldn't really be fair). Nothing like an incessantly demanding child to light a fire under you to get things done if for no other reason saving your sanity. (PSA: if you do not want to be harassed do not tell the child what you are making...)

I finished late Thursday evening long after they had gone to bed, so last night was finally the night they got to wear them. Both were very pleased.

Photobucket Pictures, Images and Photos

Wednesday, July 10, 2013

Some Selfish Sewing

I decided in the spring that I was going to do some selfish sewing to go along with my selfish knitting.  Projects that were for me all me! So far I've done the Washi Tunic - which I absolutely love on really hot summer days, and two dresses.

Today I want to tell you about my new favourite dress pattern.  It's the Jamie Dress from Sis Boom patterns.  It's a fantastic pattern.  For a PDF, the pattern pieces went together like a dream.  Sis Boom makes it completely fool proof.  There's no fiddly lining up of pieces or worse fudging pieces that don't line up together (I've had that happen before.  Grrrrr). The sizing it great with many options to choose from.  They have even included extra where needed in the bodice for us bustier girls.  Love it!  I didn't have to alter a thing in that department.  The instructions are very detailed and very clear except for what appears to be a small typo in one of the directions where the seam allowance was somewhat unclear, but it was easy enough to figure out.  (It's 1/4" in case you get stuck too!).

I could wax poetic about this pattern I adore it so much.  In fact I loved it so much that the minute I finished sewing the first dress, I immediately cut out a second one.  I never do that. (Ok. I do. If its for the kids and its a Fishsticks Designs pattern.  But for me? NEVER!) Anyways. Onto the details!

The only modification I made to the first dress was to skip the zipper.  I loathe doing zippers.  They (and buttonholes) are the bane of my sewing existence, being never able to get them just perfect.  Oh how they vex me.  To ensure fit without the zipper, I sewed the bodice as instructed, then basted the side where the zipper was meant to be and tried it on.  There was plenty of room to get in and out, which is important.  I made a dress last year that I skipped the zipper on and I'm constantly getting stuck in it. It's not pretty.

The fabric is Happy Land Claudia in Sky Blue (by Jennifer Paganelli of Sis Boom). I was able to snag it on sale from Fabric.com back in the spring.  I love the trailing flowers and their bright colours.  A bonus was up until a few days ago I had two pairs of sandals that matched the fabric perfectly.  Then the dogs ate one sandal.  I'm still a tad bitter about that, but at least I still have one pair that matches perfectly!

I didn't have anyone over four feet tall at home to take pictures for me when I finished making the dress so Little Man (Oh how it feels strange to leave out the "Toddler" part of his nickname!!) took some for me.

A few of them were mighty unflattering - that happens apparently when taking pictures at that angle.  Yikes! But I was able to save a few that aren't too bad and show the dress pretty well. As I said I love this dress so much that as soon as Little Man finished snapping pictures I went in and cut out a second dress.

Jamie Dress 1


Jamie Dress 1


The second dress is made from a random very lightweight cotton that I got in the clearance section of my local fabric store.  I had intended it for a different project, but then it seemed to say Jamie Dress to me so it's purpose quickly shifted.  I had to fully line this one as it's so light it would have felt a bit indecent.  I used an inexpensive cotton lawn that I was able to pick up in the city.  I skipped the zipper again and added side seam pockets.  I do love pockets on, well, anything.  I had meant to put them on my first dress, but had forgotten until I'd sewed the side seams of the skirt using French seams.  Unpicking them, it turns out, was far less desirable than having pockets.

I will admit to pretty much living in my second dress. It's lightweight and cool even with the lining, comfortable as pyjamas and I like to think pretty and feminine too with it's little sprigs of blue flowers and dots.

Again, I relied on my four year old fashion photographer for this next picture.

Jamie Dress 2


To wrap up, I can't say enough good things about the Jamie Dress from Sis Boom.  It's well worth the $10 price tag - I got mine on sale so I feel like I got an exceptionally great find!! Anyone from beginner sewist on up to experienced will enjoy this pattern.  Go forth and make yourself one.  You won't regret it!

Next up I'll be making myself The Honey Blouse from Make It Perfect. I'll let you know how it goes!


Tuesday, July 09, 2013

Birthday Time!

It was birthday time around here this past weekend. Little Toddler Man and I celebrated another year older on Friday. I suppose being four years old, means he's not really a toddler anymore, is he? Maybe he hasn't been for awhile and I've just been clinging to the idea that he's still little...

I thought I'd share some pictures of the fun with you!

I made the now traditional annual birthday crown. Little Man is thoroughly obsessed with dinosaurs right now, so it seemed fitting his crown be dino related. Volcanoes and lava are also very important apparently so I thought I'd incorporate that too. I was quite happy with the result, as was he!

Photobucket Pictures, Images and Photos
Rawr! 
Photobucket Pictures, Images and Photos
Volcanoes and Lava!!


On Friday night we had a small gathering with a few people that weren't going to be able to make it out for the party the next day. Little Man was excited to open some presents and have some cake, but it was a late night and the birthday boy ended up pretty tuckered out by the end of the evening.

Photobucket Pictures, Images and Photos
Whoot! Dinos!!

Photobucket Pictures, Images and Photos
The Birthday Boy and his big sister G!

Photobucket Pictures, Images and Photos
Birthday Snuggles from Aunty G!

The next morning J and his girlfriend arrived early in the day (thank goodness!!) and jumped right into helping prepare for the party! They also pitched in to help decorate the cake that was a volcano made from a layer of chocolate cake, a layer of homemade strawberry ice cream, a layer of homemade chocolate ice cream, which was all covered with chocolate buttercream and then covered in clodhoppers candies. Strawberry sauce stood in as lava and sparklers, candles and plastic dinos completed the cake that Little Man has been planning since about February.

Photobucket Pictures, Images and Photos
Team Work!
Photobucket Pictures, Images and Photos
Sparklers in my face - not sure I like that much...
Photobucket Pictures, Images and Photos
Ready to blow out his candles!
All in all it was a good birthday weekend, which (BF)G, Baby Boy, Little Man and I finished off with a trip to the beach on Sunday afternoon!

Photobucket Pictures, Images and Photos
Fun on the beach!

Friday, June 21, 2013

A Picture Is Worth A Thousand Words

Inspired by Soulemama's {this moment}

" A Friday ritual. A single photo - no words - capturing a moment from the week. A simple, special, extraordinary moment. A moment I want to pause, savor and remember."

In the busy hustle, bustle of life, this notion of a photo capturing a moment to pause and savor really appeals to me.

I haven't done this in so very long, but the little boys have had some amazing adventures this week. Instead of a single picture here is a whole series capturing our fun this week.

Moments To Remember - June 18 - 20, 2013

Photobucket Pictures, Images and Photos

Photobucket Pictures, Images and Photos

Photobucket Pictures, Images and Photos

Photobucket Pictures, Images and Photos

Photobucket Pictures, Images and Photos

Photobucket Pictures, Images and Photos

Photobucket Pictures, Images and Photos

Photobucket Pictures, Images and Photos

Photobucket Pictures, Images and Photos

Photobucket Pictures, Images and Photos

Tuesday, June 04, 2013

Summertime and the Knitting is Easy

I cast off my Work + Shelter sweater this morning.  I started this a little under two weeks ago, suddenly inspired by the other variations that were popping up on the Luvinthemommyhood KAL's Finished Object Picture thread on Ravelry.  I had thought there was a chance I could zip through it between the 23rd when I cast on and the 29th when the KAL ended, but alas.  I am not that quick a knitter, nor did I have that much energy to stay up that late at night each night to accomplish a feat quite like that.

I knit it in SWTC Bamboo - a yarn I had in my stash for several years. I originally bought it online in a bag sale from Discontinued Brand Name Yarns to make my Josephine Top. This yarn is fantastic. I machine washed and dried my Josephine lots over the course of time and it still looks great. (I just don't wear it much anymore because I lived in it when I was expecting the little boys and now associate it with maternity wear even though it wasn't intended as such).

I did do a couple easy modifications on the pattern. I wanted a touch more length than the pattern allowed for so I added an extra lace stripe before attaching the sleeves.  This also allowed for the lace on the sleeves to line up with the lace on the body and I do love symmetry, so was happy that it worked out that way!  I also started the ribbing for the neckline early in order to have a lower, wider neck.

I feel like quite a "grown up" knitter right now.  I not only took the time to put all the stitches on waste yarn to see how the length would be once I joined the sleeves and reworked it to a proper-for-me length, but I did the same thing again at the neckline to see where I wanted it to sit. I didn't just blindly follow the pattern hoping for the best (which in this case would have been a short, high necked disappointment). Yay for putting in the extra effort!!  I LA LA LOVE my new sweater!!! I also la la love how easy it was.

Saturday, June 01, 2013

Misty Morning

I finished another knitting project yesterday.

I cast on my Augusta Cardi at the beginning of April as an "in between" project. One I could work on when I needed a diversion from other projects and while I waited for the Luvinthemommyhood Tops, Tanks and Tees KAL to begin. It was a perfect project for those purposes. Easy to put down, forget about, then come back to and know where I left off. It was also pretty mindless knitting, so great for those times that my mind was going in a million other directions and I didn't want to have to think about my knitting too. Augusta is my second project from the book New England Knits; although my first project, the Montague Vest is still in time out for bad behaviour (I need to re-do the front edging. Grrrrrrr.)

I'm really happy with the final result, and even happier that I put some extra effort in to get that result. Although this project was not without problems it went together well! I decided to use some stash yarn that was gifted to me a few years ago by a very generous soul, determined to destash, that I met while on a business trip down east to Toronto. It's Cottage Craft (produced by Briggs & Little) 2 ply worsted wool in the colourway Fundy Fog. Oh how I love the maritime names of B&L yarns. Ever since reading Anne of Green Gables after a windfall find of an unopened boxed set for $1.00 at a used book sale when I was seven years old, there has been a part of my heart that belongs to the maritimes. Although, admittedly, my love is only second hand from books and music as I've never had the good fortune to visit in person yet. I digress. Back to the knitting.

Photobucket Pictures, Images and Photos
Yikes! Where to begin?!?

At some point one of the cats that have resided with us over the last few years got a hold of one of my skeins on Fundy Fog. I did have plenty others, I could have just discarded the one the cat had enjoyed, but that goes against my thrifty (some would call it pack rat) nature entirely. So one morning I patiently untangled and rewound all 270yds of yarn. Once the yarn was untangled, I was set to go.

I have been wanting to try short row shoulders for quite some time now and thought Augusta would be the perfect project to try it out. I am a convert. I love the smooth transition that comes from the short rows rather than the "stair step" effect of casting off. And what is not to love about eliminating two seams from the finishing sewing?!? A quick three needle bind off and you're done!

Photobucket Pictures, Images and Photos
Short rows and a three needle bind off!

After the yarn was untangled I had assumed things would be smooth sailing. And it would have been for the most part had I not absent mindedly knit an extra cable repeat on one front giving me an excess three inches of length I didn't notice until I began blocking the piece. That was easily enough fixed though and I moved onto the sleeves.

There is something about sleeves. They are my knitting nemesis and take me forever to knit. I do always try to knit them two at a time so that once I'm done, I'm done (otherwise every garment I knit would run the risk of being one armed, so great is my dislike of knitting sleeves!!) I knit and knit and knit some more, yet I swear the knitting didn't grow. According to the pattern I was to knit 20" from cuff to underarm before starting decreasing. I had read several comments about the sleeves being too long so I patted myself on the back for having the foresight to decrease the length by an inch. Once my sleeves were done I carefully seamed up one and sewed it to the sweater to gauge fit. Holy gorilla arms batman!!! I hummed and hawed about what I should do. Leave it and likely never wear the cardi? Hem them and end up with weird bulk at the wrists? Unseam, rip back and make them shorter? Shudder!

I chose to do the right thing. The mature knitterly thing. I wanted a sweater I could love and live in so I ripped back. I started my decreases at 17 1/2" instead and continued on. The sleeves are still a touch long, but I can definitely live with them.

Liking the results!
I'm really glad I had my sweater this morning! After two days of ark building worthy rain, this morning was just cool (about +5C) and a touch drizzly. The little boys were determined to play outside no matter what. I didn't mind though. I grabbed a cup of tea and braved the elements, cozy and warm in my new cardi despite the misty morning!

The perfect cozy sweater for a misty morning.
The sun came out late this afternoon making me really want to get back to work on my Work + Shelter top I started on a whim last week after seeing all the great versions of it done by other knitters for the Luvinthemommyhood KAL! I'm pretty close to being done and  hopefully the weather co-operates and I get to wear it as soon as it's off the needles!

Tuesday, May 21, 2013

Summer Lovin'... Sort Of

I decided this year I was going to take part in Luvinthemommyhood's Tops, Tanks and Tees Knit Along. I knew I wanted to knit Jane Richmond's Gemini and I knew I had some pretty DK weight in a silk, linen, rayon blend that would probably work. I couldn't wait to cast on!

Photobucket Pictures, Images and PhotosI swatched ahead of time so that come April 24th I could dive right into knitting. It went along fairly smoothly pattern wise. Yarn wise was another story. I was using the long since discontinued Chanson from Grignasco, and was worried about my yardage to begin with. Then there were knots upon knots in almost every ball. Only one out of my eight wasn't knotted at least twice. So frustrating. And soooooooo many ends to weave in. Not to mention my knitting time was fraught with anxiety over playing yardage chicken.

As it turns out I had no need to worry. I had a bit left over from that last ball and it just so happens I should've made an entire size smaller. I have no idea what went wrong. Not a clue. I did choose a size with only 2" negative ease instead of 4" negative ease as suggested in the pattern. I don't really like tight clothes, but did still want a semi fitted top. You can imagine my horror as I cast off the last few stitches and finally got a really good look at my sweater. It said "Too Big" all over it. Then I tried it on thinking maybe it just looked deceptively large.

Photobucket Pictures, Images and Photos

Photobucket Pictures, Images and Photos

Nope. Nothing deceptive about it. It's a lovely, flowy, slightly A-line top. What the heck? It appeared to fit like a dream when I tried it on just after separating the sleeves. Now, don't get me wrong. I can embrace the fact it's not like I envisioned. I'm ok with loose and flowy. What I'm not ok with is a neckline that stretches as I'm wearing it so that suddenly I'm looking like I'm trying to pull off an Jennifer Beals/Flashdance look. I retired that off the shoulder, slouchy look somewhere around grade eight for good reason. There is no way I want to bring it back now in my 40s. Yikes!

So! I need to come up with a solution. My choices seem to range from ripping the whole darn thing out and starting over (the horror!!!!), attacking it with my sewing machine and a pair of scissors (which makes me want to run and hide under the bed just thinking about it), crocheting decreasing rounds at the neckline to snug it in (clearly the least painful option so far) or tossing it in the box with my other knitting fiascos I've had over the years (so sad because I really do love the colour of my yarn). Right now it sits on my dresser where I can glare at it while I decide it's fate. Which would you choose?


Channel Your Inner Elvis

I spent half of last week thinking about cupcakes. Not just any cupcakes. Chocolate cupcakes. Chocolate cupcakes kicked up a notch. Chocolate cupcakes involving bananas. And peanut butter... (sometimes my mind has a lot of time on it's hands apparently)

This weekend that vision became a reality.

I started out with my usual chocolate cake recipe, but changed it up a teensy, tiny bit. Then I made my usual chocolate buttercream, but changed it up a bit too.

Success. Sweet, sweet success!!!!

Photobucket Pictures, Images and Photos
Mmmmmmmmmmmmm

Are you thinking about cupcakes now? Here's the recipe if the little voice in your head is now telling you that you need to channel your inner Elvis and dine on some chocolate banana cupcakes with chocolate peanut butter frosting.

CHOCOLATE BANANA CUPCAKES SUPREME

2 cups flour
1 2/3 cups white sugar
3/4 cup butter or margarine
1 tsp salt
2/3 cup cocoa
1 1/3 cup milk
1 1/2 tsp baking soda
1/2 tsp baking powder
2 eggs
3/4 cup mashed ripe banana
1 tsp vanilla


Pre-heat oven to 350F (170C)

Combine all ingredients into mixing bowl, beat with mixer on medium speed for two minutes until creamy then divide into muffin tins lined with cupcake liners. Bake for approx. 20 minutes

When cool finish off with the pièce de résistance - chocolate peanut butter buttercream (unless of course you are serving these to anyone who may have a nut allergy. Just stick with chocolate instead. It'll still be great. I promise. After all cupcakes should be enjoyed happily and safely by all)

Chocolate Peanut Butter Buttercream

1/2 cup shortening
1/2 cup butter or margarine
3 TBSP peanut butter
1 tsp vanilla
2-4 TBSP milk
4 cups icing (confectioner's) sugar
1/3 cup cocoa powder

Mix all with hand mixer until creamy and smooth.

Enjoy!!!!

Thursday, May 16, 2013

Bath Time for A Little Friend

The other night Baby Boy's Flannel Friend was the unfortunate victim of a wardrobe malfunction that left Baby Boy, his bedding and his flannel friend soaked. That's the last time I buy a brand of disposable pull ups just because they're on sale so much cheaper than our usual brand. Apparently there's a reason they're so much cheaper! Nothing like a late night complete change for a sad and soggy toddler.

Anyways, poor Flannel Friend needed a bath in a big way! Surface washing was not going to even come close to fixing what ailed this little guy. So yesterday he got one. You can't just throw them in the washing machine and dryer, they need a bit more special treatment than that given they are stuffed with 100% wool. Felting the stuffing would lead to a very sorry looking (and feeling)friend. So here's how we do it here at our house in three easy little steps.

1) I filled the kitchen sink with lukewarm water and added some detergent - use whatever you like as long as it's not too harsh, what you would hand wash your wool sweaters in is fine. (ahem, confession time... I used a squirt of Dawn dish soap)

2)Then Baby Boy's little friend was placed in the soapy water and gently swished about. You don't want to be too vigorous with your swishing because too much agitation can cause the wool stuffing inside to felt and get lumpy.

Photobucket Pictures, Images and Photos
Rub a dub dub, Flannel Friend's in the tub

3)Once you feel bath time has been long enough, you need to rinse well to get all traces of soap out. To do this I ran clear water over him, gently squeezing as I went until the water ran clear with no bubbles. Then he went outside to the deck to sunbathe (more commonly known as air dry).

Photobucket Pictures, Images and Photos
Basking in the sunshine

And there you have it! Easy as one, two, three.

A fresh, clean, smells much better than it did friend all ready for bedtime snuggles again!

By the way, if anyone is interested in ordering a Flannel Friend for themselves or a little person they know, please don't hesitate to contact me and we can discuss details. I am always happy to do custom orders and turn around time is about a week or less (not including the time it takes to ship through the post)