Friday, August 24, 2012

A Picture Is Worth A Thousand Words

Reading Soulemama's blog I was inspired by her {this moment}. She says,

"A Friday ritual. A single photo - no words - capturing a moment from the week. A simple, special, extraordinary moment. A moment I want to pause, savor and remember."

In the busy hustle, bustle of life, this notion of a photo capturing a moment to pause and savor really appeals to me.

A Moment To Remember


Photobucket Pictures, Images and Photos
August 23, 2012/td>

Friday, August 17, 2012

Spicy Chicken Sandwiches

One one my favourite things to make (and eat!) are chicken sandwiches. They're quick, easy and have just the right amount of spicy kick to them. You can grill the chicken, but in this house BBQ-ing is a man's job - to be honest it's only because I'm a little terrified of lighting the thing, so I just broil mine. Much easier (and considerably less scary than dealing with propane and a lighter).

Photobucket Pictures, Images and Photos
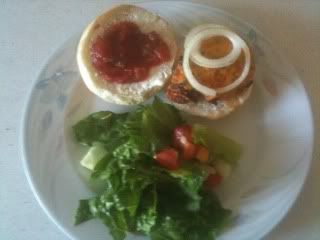
Mmmmmmm... Spicy Chicken!


Spicy Chicken Sandwiches

4-6 boneless, skinless chicken breasts
1/2 35g. package of taco seasoning (I use Old El Paso reduced sodium but you could use any kind or make your own - let me know if you have a great homemade version!)
1/2 - 3/4 cup grated Parmesan cheese
Cheddar cheese, grated
Salsa
Onions
Tomatoes
Lettuce
Mayonnaise
Buns, split in half (I prefer homemade using my bread machine - recipe below)

Heat oven to broil while you prepare the chicken.

In a medium sized ziploc bag combine cheese and seasoning. Coat each piece of chicken one at a time by placing it in the bag and shaking it. Put coated chicken on broiler pan (or heated BBQ grill) and place in oven on rack set so the chicken is about 5" from broiler. Broil until chicken is done. Time varies with the thickness of the chicken pieces, but I find checking them after 15 minutes to work well. Once chicken is cooked, slice each breast in half, sprinkle with grated cheese and return to the oven to melt cheese.

To assemble spread split buns with mayonnaise, put on half of a chicken breast, a dollop of salsa, some sliced onions (and tomato slice and lettuce if so inclined). Serve with homemade fries or a green salad and you have a perfect fun Friday night (or any night) meal!

Note: for Baby Boy and Little Toddler Man I coat their chicken with just Parmesan and skip the salsa to make it easier on their little tummies.

Photobucket Pictures, Images and Photos
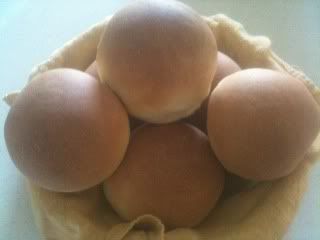
What could be better than fresh from the oven buns?

Bread Machine Buns

1 cup warm water
3 TBSP sugar
3 TBSP oil (I use Canola)
1 tsp salt
3 cups white unbleached flour
1 1/4 tsp bread machine yeast

Place ingredients in bread pan in order given. Place pan in machine and set to dough setting. When the dough cycle is finished turn dough onto a lightly floured board. Cut into eight pieces and shape into round buns. Place on parchment (or cornmeal) lined baking sheet, cover and let rise in a draft free (or in this house more importantly a thieving dog free) spot for one hour. Preheat oven to 375F (190C) and bake buns 16-17 minutes until golden brown on top. Cool on wire racks.

I use this recipe almost daily shaping it into hamburger buns, dinner rolls, hotdog buns and bread depending on what we need.

Hope you enjoy this as much as I do!


A Picture Is Worth A Thousand Words

Reading Soulemama's blog I was inspired by her {this moment}. She says,

"A Friday ritual. A single photo - no words - capturing a moment from the week. A simple, special, extraordinary moment. A moment I want to pause, savor and remember."

In the busy hustle, bustle of life, this notion of a photo capturing a moment to pause and savor really appeals to me.

A Moment To Remember

Photobucket Pictures, Images and Photos

Friday, August 10, 2012

Reading Soulemama's blog I was inspired by her {this moment}. She says,

"A Friday ritual. A single photo - no words - capturing a moment from the week. A simple, special, extraordinary moment. A moment I want to pause, savor and remember."

In the busy hustle, bustle of life, this notion of a photo capturing a moment to pause and savor really appeals to me.

A Moment To Remember

Photobucket Pictures, Images and Photos

Tuesday, August 07, 2012

Baby Dolly and Big Boy Dolly

I got a great little book for Christmas called Growing Up Sew Liberated. I highly recommend it if you have any children in your life that you want to sew for! I loved the first project I made as did the boys. Remember the play tent I made early in the new year?

Photobucket Pictures, Images and Photos
This tent has logged a lot of playtime since the picture was taken!

My next project from the book is Little Amigo, a Waldorf style doll. Baby Boy loves babies, so I thought he might like to have a baby of his own. Every time he saw the picture in the book he'd squeal, "Baby Dolly!!". So I started researching sources for fabric, tubing and stuffing. Ordering from a few different places helped cut my costs considerably!

Photobucket Pictures, Images and Photos
All my supplies - Ready to go!

All my supplies arrived in good time, so I set to work, feeling a bit like a fish out of water, but enthusiastic about my new endeavor! I ended up confused by about step two. That wool stuffing refused to become a ball of any sort let alone a firm one to form the core of the head. Frustrated, I began searching the Internet for guidance on head making. I finally got to a fabulous tutorial on the Moonchild Dolls site. After reading through Berrie's tutorial it suddenly all clicked. Head making began in earnest!

Photobucket Pictures, Images and Photos
We have a head!

Several attempts later I had a head that I was happy with. (We won't discuss how many attempts embroidering the mouth took. Let's just say it's not as easy as it's single solitary stitch looks! Gah!)

Photobucket Pictures, Images and Photos
And a face!

Once the head was done the rest went pretty smoothly. Only a minor set back with some overstuffed linebacker-esque shoulders that was easily solved by unstuffing some, and Baby Dolly was done. I modified the clothes pattern from the book, and followed Sew Liberated's tutorial for a braided cap for the hair. Baby Boy loves his Baby Dolly.

Photobucket Pictures, Images and Photos
Almost done!

Photobucket Pictures, Images and Photos
Getting closer!

.
Photobucket Pictures, Images and Photos
Done!!!!!

Before tackling hair for Baby Dolly though I started work on Little Toddler Man's doll, which he tells me is not a baby, but a big boy doll, just like him. It was a pretty smooth process. For his I followed a great set of pictorial instructions for a crocheted cap. I was well pleased with myself given crochet generally confuses the heck out of me! Only problem is now I'm hooked (pardon the pun), and want to crochet all things...

Photobucket Pictures, Images and Photos
Dark blue eyes for my dark blue-eyed boy

Photobucket Pictures, Images and Photos
So close to being done!

Photobucket Pictures, Images and Photos
Look! Crochet!!!

Photobucket Pictures, Images and Photos
Little Toddler Man's doll is done!

Anyways, to wrap up, this was possibly one of the most rewarding projects I've done in a long time. To see how the boys love them makes every bit of effort that much more worth it! I especially felt it the day they both had to have their dolls sit in chairs beside them at supper so they could pretend to give the dolls supper. Or when they each take a hand of one of the dolls and "walk" it from one room to the next. Or when Baby Boy saunters through the house giving Baby Dolly a ride on his shoulders. What a fun project it's been!

Photobucket Pictures, Images and Photos
Two little boys loving their bald dolls

Photobucket Pictures, Images and Photos
Brother dolls done!!