Thursday, November 14, 2013

This Bag's Got Bling

A few weeks ago I got an email from Anna over at Charmed Liebling.  I'm always excited to see a message from her appear in my inbox. It means she's been pattern making again and needs testers. I really do love testing for Anna! She's great to work with and has fantastic designs!

This time was no different! As soon as I saw the bag I knew I would say yes, even though this time of year I'm up to my eyeballs in crafting for the holidays. But I even knew exactly what fabric combo I wanted to use, and had almost everything in my stash already. Fate, it was, I tell you. Fate.

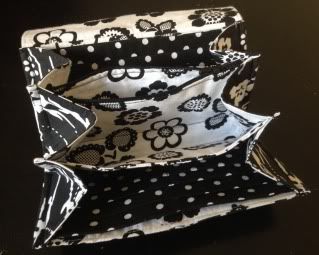
The bag went together really quickly despite all the extra details. I love that it has so many pockets both inside and out! My favourites though are the V-shaped front slip pocket and the elasticized pocket on the inside.

My biggest challenge proved to be the rivets. Not the application of them, but the procuring of them. Agh. So frustrating!  As per usual my tiny shop in town had nothing. The fabric store chain in the city had a pitiful selection, not too mention they sell a few packets of rivets but not the tools you need to apply them. Did I mention it was frustrating?

At that point, since I was on a deadline, I chose the ones I thought might work the best. I really wanted plain silver, but none were to be had so my bag's got bling. Sparkly red crystal rivets - the choices were purple, green or red. I thought the red the best option. To apply them I used a combination of my eyelet pliers, an old drum practice pad from when I was learning drumming in 402 Squadron's Pipe and Drum band back as a teenager in the mid-eighties (using it to apply the rivets was probably the most productive use it's ever seen - goodness knows the drum lessons weren't successful!), and random bits and bobs from old eyelet and snap sets until I found one that worked.  After consulting with Janelle of Emmaline Bags I now know that the next time I want rivets I'll go directly to Tandy Leather in the city, they even do online sales! But I was short on time. I should have talked to her first!

My other frustration with my bag was my fabric choice. Velvet and I have never been fond of each other, especially after the tailored velvet highland dance jacket incident of 2009, which saw me, nine months pregnant, sobbing at my machine, coming well and truly unhinged while trying to make a perfectly fitting jacket for G to wear while competing in Canadians a week later - she ended up wearing her old jacket and a borrowed kilt. That particular beast that sent me over the edge is still at the bottom of my bin of "fancy" fabric. But I digress. Suffice it to say velvet is not usually a fabric choice I make willingly.  My other problem was that my wool blend has a bit of stretch to it. Gah!!!! Not a fun combination, although I like the end result. So all's well that ends well.

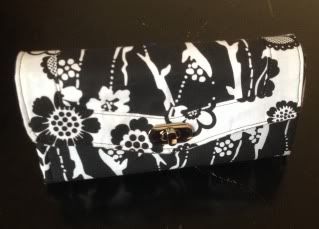
Anyways, here's my sophisticated wool blend and velvet bag with bling! Perfect for a night out on the town... Or at least I imagine it would be. With (BF)G's work schedule and the little boys, we're not really night out on the town people. We tend more to the hermit/homebody type truth be told, but should the occasion arise  down the road! I will have just the handbag for it!

Photobucket Pictures, Images and Photos
Front view - I LOVE that V slip pocket!

Photobucket Pictures, Images and Photos
Back View - Another pocket!

Photobucket Pictures, Images and Photos
Inside view - look at all those pockets in there!

Photobucket Pictures, Images and Photos
Told you my bag has bling!

If you'd like to make yourself an All Day Out Bag, hop on over to Anna's site, Charmed Liebling. You can purchase the pattern and read more about her design on her blog!

Saturday, November 02, 2013

The Dog Ate My Wallet...

Really. She did. Actually it was a few years ago now that she chewed the corner off of it and it's been a source of embarrassment since. Nothing says classy like a wallet with a big bite out of it. Good grief!

I've been looking for a replacement for a long time, but never found one in the stores that I liked enough. So then last year I started looking at patterns and tutorials, but I always found something I didn't quite like about them. Fast forward to a little while ago when I found the Necessary Clutch Wallet from Emmaline Bags.  I was completely taken with it. Roomy, oodles of spots to put things and it looks darn good as well. I was sold.

It's taken me a little while to sew, mostly because I had to make the boys' knapsacks, my swap gift and the Halloween costumes. It was also a bit daunting to tell you the truth, only because I've never made anything quite like it yet.

The instructions that Janelle provides with the pattern are excellent though. Clear as can be, lots of photos, and really thorough. I was quite impressed.  I had cut out one set of fabric for it, but then going through my cottons fabric bin one night in search of something totally unrelated I came across the left over fabric from my Working Girl Laptop Bag and knew I really wanted to make a black and white wallet instead.

I started out one evening with great gusto. Well, that is until I got to step three where I had to put the locking clasp in. Eeek! Somehow it was more stressful than the one I did on my laptop bag.  I think the instructions should come with the first step of having a stiff drink! Cutting holes in fabric, fumbling with teeny tiny screws that are nearly impossible to find when they fall under the sewing desk, glue running everywhere... Yikes! But I had my trusty assistant Fluffy the kitten to cheer me on in his own special way of climbing on my head or sitting right on top of it all. Maybe stiff drink should also be the final step of that part too.  In the end I managed to conquer the locking clasp and oh what a beauty it is. The screw in plate, despite all my trials and tribulations, makes such a nice professional looking finish.

Look at that locking clasp looking all innocent
and not at all like it almost drove me to drink!
I had a few moments of frustration along the way, but nothing to do with the pattern. I tried several times to put in the card slot section of the wallet. My BFF the stitch ripper was my constant companion. After several tries I gave up. There's only so much I can take in one sitting. After I felt a little less like tossing the whole thing out the window, it occurred to me that maybe I should double check my measurements. Guess what?!? Even though I use a rotary cutter, ruler and mat with grid lines I had somehow cut the whole piece almost a quarter of an inch too narrow. The mind... It boggles. I cut a new set of pieces and lo and behold, problem solved.

I finished my wallet yesterday afternoon and I LOVE it! I transferred everything over from the overstuffed,  chewed up one to my brand spanking new Necessary Clutch and would you believe I have tons of room left in it? It's kind of like Mary Poppins' carpet bag. It doesn't look overly huge until the lamp gets pulled from it.  I won't likely carry that much in it, but nice to know I could easily stash my phone  right in my clutch wallet if I wanted to! I just can't say enough good things about the Necessary Clutch Wallet pattern. 

The Mary Poppins carpet bag of wallets!!
See, what did I tell you?! Look at all that room! There's a slip pocket on either side of each card slot section - which, by the way, has a total of twelve slots - then there's the zip pocket you can see there with the zip opened to give you an idea of size, and lastly a section in the middle that is roomy enough for my cel phone!  But even with all that room inside it all compacts nicely into an "easy to pop into your purse" size!


The Necessary Clutch Wallet
I wonder how many wallets a girl can have? I'm already thinking about that other one that's already cut out...