What seems like forever ago, Lisa of Paprika Patterns generously sent me a copy of their Zircon Sweater/Dress pattern to review. I was really excited to get a chance to sew it up because the design details really intrigued me. Then life happened. And then Christmas happened. And then more life happened. And now here it is, the first day of spring, and I'm reviewing a top that I had initially planned as perfect for cozying up in through the long cold winter months. Oh well. Depending on your own fabric choices you could easily make this one for whatever season you wanted! So, lets get on with my better late than never review of this versatile pattern from Paprika Patterns!
Zircon, as I mentioned, has a some really neat design details. The geometric shaped yoke and insets look really challenging to sew, but in actual fact are no where near as bad as it would seem. It does take time to achieve nice crisp corners, but if you take that time and go slowly its well worth the effort! Lisa walks you through it pretty thoroughly in the pattern instructions but if you're still hesitant or struggling, she has a tutorial up on the Paprika Patterns site as well which will guide you through.
Other than the yokes and insets - spoiler alert: the insets for the top are super easy especially since you'll be so practiced on the yokes by the time you do it. It took me a few minutes and I didn't even use pins at all and they came out pretty darn good if I do say so myself! - the rest of the sewing is very easy to do.
Fit wise I have absolutely no complaints. I chose a size seven based on my measurements (and previous Paprika Patterns designs) and only added a bit of length to the body for personal preference. Zircon comes in the usual vast range of sizes for Paprika Patterns - sizes 1-10 or a finished bust of 35" all the way to 50 1/2" and I found it to be right in line with the sizing of the other Paprika Patterns garments I've sewn in the past. I do really love it when I can trust that a new pattern by a favourite designer is going to give me the same great fit I've come to expect from their previous designs and Lisa does a fantastic job of delivering on this. I've not been disappointed yet.
For me the biggest challenge of Zircon is fabric choice. One of my delays was my initial choice of fabric. As soon as I laid out my pattern pieces on my fabric I realized what a poor choice I'd made. I was on the fast track to resembling none other than an ill fated Star Trek "red shirt". Thank goodness I realized it before putting scissors to fabric! I quickly realized that my next choice was still pretty Star Trek-ish although at least I'd likely live to see another day, unlike the red shirts. Don't get me wrong. I am a Star Trek fan to a certain degree, but that does not mean I want to go through life looking like a Star Fleet wannabe. So, back to the drawing board. I eventually settled on using a somewhat texturized looking knit for the body and it's plain reverse side for the yoke and inset detail. I'm not crazy about the fabric, but it's definitely better than my previous plans!
My only slightly negative thought, (and it has nothing to do with the pattern quality at all) is that the neckline feels a touch too high for me. I've been mulling over this since finishing my top (ok - really I finished it just before lunch and it's only 2pm now, so it's not been a lot of mulling) and I feel that the high feeling neckline is just me and my preferences. I generally sew/wear tops with a lower scoop or v neck as I find they feel a bit more comfortable and flattering on me, but I'm going to give it some more time to see if it grows on me before I change it up at all. I didn't worry about finishing the edge of the neckline at all, so if I do decide to change it down the road, I won't have to fight with removing serging.
I actually only serged the hem and the sleeves (and of course once I make a decision about the neckline I'll finish it off with some serging too). The rest of the pattern was easier to just leave the seam allowances as is so as not to add any bulk on the corners. The stable knit I chose doesn't curl at all at the edges and of course being a knit, it won't fray either, so I wasn't worried about finishing them off. I just notched all the corners before pressing to get them to lay flat and smooth. (holy cat hair, Batman! Fluffy the very annoying feline sewing assistant was sitting on my fabric while I was working on it and it shows. I guess he felt it the comfiest spot in which to chew on the thread as it passed by. Damnable cat. He thinks thread makes the best kitty dental floss ever. Especially if it's moving through the machine at the time. Aggghhh. Anyways. Apologies for the frightening amount of fur in the photo!)
All in all, I give the Zircon Sweater/Dress pattern a two thumbs up and highly recommend it! It'll be a great addition to any wardrobe and depending on fabric choices can take you from season to season. I feel it could easily be dressed up or down too, depending on the fabric from downright comfy weekend sweatshirt to something much classier and going out or office appropriate. So a big thank you to Lisa for sending me the pattern!
*Just a quick reminder that although I did receive the pattern for free all opinions expressed here are my own, so you can feel confident that if you choose to sew up your own Zircon you'll really be getting your money's worth with this pattern.
Showing posts with label review. Show all posts
Sunday, March 20, 2016
Sunday, March 01, 2015
The Jade Skirt
As promised the other day, I've finished sewing the Jade Skirt and I'm back here with a review* of it for you.
European based, Paprika Patterns, have just re-released the Jade Skirt last week, with some updates and improvements to their original first pattern. The sizing has been increased (up to a 50.5" hip now!) and fit has been improved. You may have seen the Jade Skirt for awhile now - I know it keeps popping up when I'm browsing Pinterest! It's got a unique look with the origami style folds along the front of it. It's also got a unique method of construction, but don't worry about that. There's lots of suggestions, tutorials and even a short video available to help you along the way.
Let's get down to the nitty gritty. When you purchase the Jade Skirt pattern you will receive six different files, which seems like a lot, but it's broken down into separate ones that include an introduction, the instructions, a print guide, two for the pattern printing - one that you can have done at a copy shop and the second one is the print at home version, as well as a practice sheet to get those folds down pat before you move onto working with your fabric. The multiple files make it easy to find just what you're wanting instead of scrolling through page after page to find it. The skirt comes in two lengths - mini (which I made) and midi which is of course a bit longer and there's also a handy tutorial on the website if you need to make some length adjustments too!
The instructions are really thorough, with lots of line drawings to illustrate what you are supposed to be doing, and as I mentioned if you run into trouble, you can head on over to the Paprika Pattern website for everything from the video demonstrating the folding to a quick tutorial on how to add elastic to your waistband if you want. The links are all there in the instructions so you don't have to search around at all, which I found really helpful.
The pattern was easy to print out and assemble - my only issue being when it came time to know where my cutting line was for the mini length I was making, I accidentally started following the fold line instead of the cutting line. Oops! It definitely required a wee bit more concentration to make sure with all the lines there that I didn't get off track. (That could just be me though. I've been known to get distracted easily... Oooh! Look! Shiny things...)
Sewing up the skirt was fun. I looked at the instructions and then hopped on over to watch the video so I could get the hang of folding. It definitely is the lengthiest part of the process. Once the folds are done and secured the rest of the skirt goes together very quickly though. I sewed mine in a couple of afternoons, taking just a half hour here or there to work on it, but you could easily print off the pattern, cut it out and sew it up and be ready to wear it out on the town in a matter of a few hours. Instant gratification and instant wardrobe expansion! What I really liked about the construction is that that all the seams are enclosed and done in such a way it's super easy. No worries about fiddling with finishing seam allowance.
So let's talk about my version of the skirt. I decided, that since I don't generally wear shorter closer fitting skirts myself, I would make it for G instead. I had a charcoal grey, long jersey skirt that has been sitting in my closet for years (about 10 maybe since I last wore it?) and I thought it would be perfect reincarnated as the Jade Skirt. I could only do the shorter mini length, given my fabric constraints and would have to piece together the waistband, but it was such a great weight for the skirt I went ahead with it. Just for fun, I lined it with hot pink lycra jersey with approximately the same stretch percentage that has been in my fabric stash since my days working at the fabric store back in the late 90s. I do so love a pop of colour when using neutrals, even if no one else knows they're there. I also chose to do the elasticized waistband option since I was using a fairly light weight knit. Nothing worse than your skirt slowly migrating south on you as you go about your day (I was fairly certain G wouldn't appreciate that - I am possibly not yet forgiven for the time her Aboyne wasn't fastened properly at the waist and left her dancing the Scottish Lilt momentarily in her underskirt as her skirt puddled around her feet at a competition years ago).
I'm quite happy with the skirt and pretty impressed with Paprika Patterns. G's happy too! She declares it a very comfortable and figure flattering skirt and has already asked me to make her another one as soon as possible.
I'm looking forward to trying my hand at the Jasper Sweater for myself - I've been eyeing that sweater since it first popped up on Pinterest long before Lisa ever drafted up the pattern for the public - and also definitely looking forward to seeing what is in store for the future with their stylish and unique designs.
European based, Paprika Patterns, have just re-released the Jade Skirt last week, with some updates and improvements to their original first pattern. The sizing has been increased (up to a 50.5" hip now!) and fit has been improved. You may have seen the Jade Skirt for awhile now - I know it keeps popping up when I'm browsing Pinterest! It's got a unique look with the origami style folds along the front of it. It's also got a unique method of construction, but don't worry about that. There's lots of suggestions, tutorials and even a short video available to help you along the way.
Let's get down to the nitty gritty. When you purchase the Jade Skirt pattern you will receive six different files, which seems like a lot, but it's broken down into separate ones that include an introduction, the instructions, a print guide, two for the pattern printing - one that you can have done at a copy shop and the second one is the print at home version, as well as a practice sheet to get those folds down pat before you move onto working with your fabric. The multiple files make it easy to find just what you're wanting instead of scrolling through page after page to find it. The skirt comes in two lengths - mini (which I made) and midi which is of course a bit longer and there's also a handy tutorial on the website if you need to make some length adjustments too!
The instructions are really thorough, with lots of line drawings to illustrate what you are supposed to be doing, and as I mentioned if you run into trouble, you can head on over to the Paprika Pattern website for everything from the video demonstrating the folding to a quick tutorial on how to add elastic to your waistband if you want. The links are all there in the instructions so you don't have to search around at all, which I found really helpful.
The pattern was easy to print out and assemble - my only issue being when it came time to know where my cutting line was for the mini length I was making, I accidentally started following the fold line instead of the cutting line. Oops! It definitely required a wee bit more concentration to make sure with all the lines there that I didn't get off track. (That could just be me though. I've been known to get distracted easily... Oooh! Look! Shiny things...)
| Upcycling and using up old stash! Love it when I can do that! |
![]() |
| The Jade Skirt! (I did iron it - honestly...) |
![]() |
| Look at that fun lining!! |
I'm looking forward to trying my hand at the Jasper Sweater for myself - I've been eyeing that sweater since it first popped up on Pinterest long before Lisa ever drafted up the pattern for the public - and also definitely looking forward to seeing what is in store for the future with their stylish and unique designs.
*Lisa of Paprika Patterns did generously send me a copy of the pattern free of charge, but all opinions expressed here are my own.
Friday, June 06, 2014
Blue Birds of Happiness
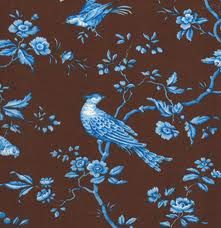
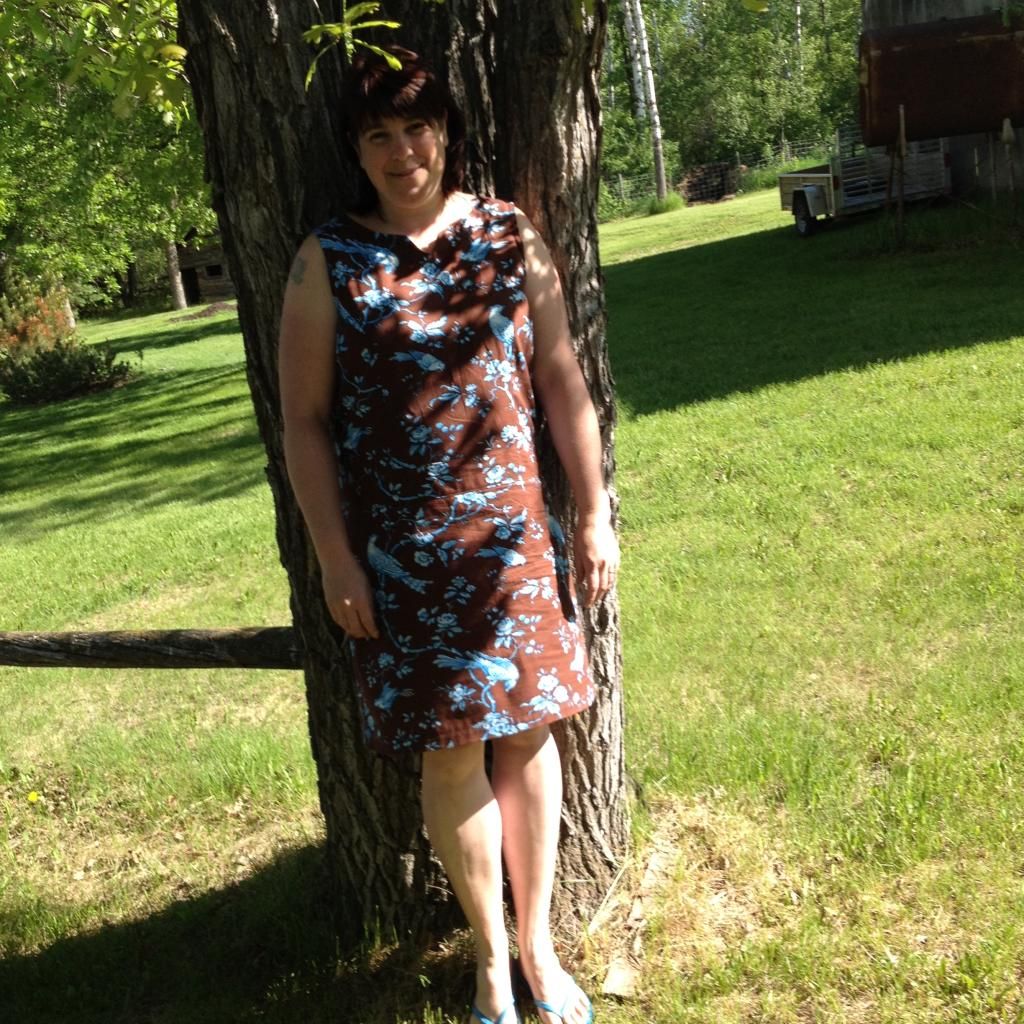
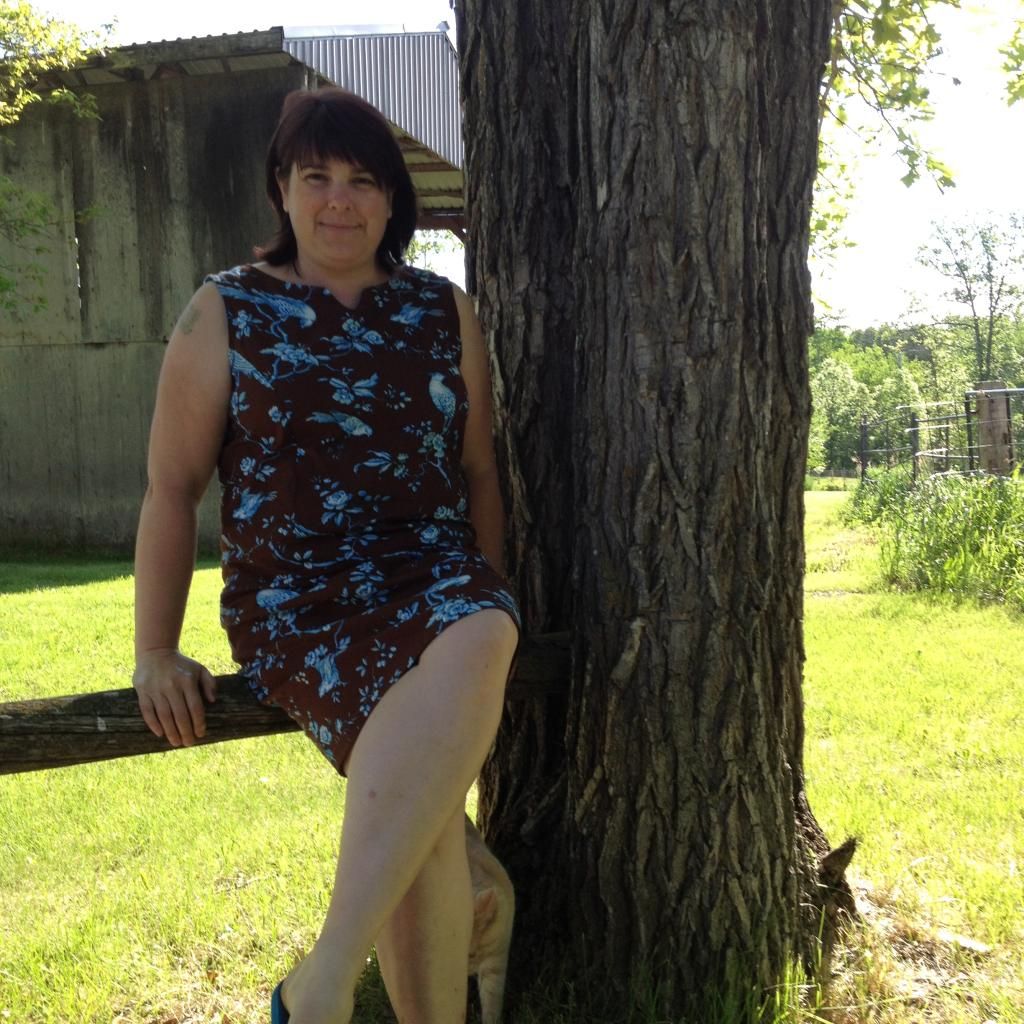
Last summer when I was ordering fabric for my Jamie Dress, I found Jennifer Paganelli's West Indies collection and fell head over heels for Matilda in Cocoa. The birds were too pretty to pass up so I ordered 2 1/2 yds. I had no idea what I'd make with the large overall print. Initially I had thought perhaps another School House Tunic. Maybe a Torii Tunic? Or a skirt? I knew to really let the fabric shine I would require a pattern with simple, understated lines. Nothing fancy or finicky. I mulled over possibilities throughout the winter, unable to decide until suddenly, a few weeks ago, I remembered a pattern I had picked up on sale at some point last year. Sis Boom's Rebecca Shift. It fit the bill perfectly!
For a PDF pattern, you just can't beat the Sis Boom patterns. I could go on and on about them. Seriously! First off I hate having to print off a gazillion pages only to find out that for my size half of them get cut away. The beauty with Sis Boom? You're given a table that tells you exactly what pages you need for your size. And with a pattern like Rebecca that you may want to "Frankenpattern" using different sizes she breaks down the pagination for each of the components. LOVE this feature!!!!!
And I may have grumbled, muttered, cursed on more than one occasion about my dislike of the pasting together and cutting of pattern pieces. But let me tell you, these are the stuff pattern putting together dreams are made of. It doesn't matter if preschoolers have "helped" by rearranging my pages from one end of the house to the other. I can easily tell which piece belongs where with the shaded sections that clearly not only tell me what they should be joined to but show exactly how much they should overlap each other. I can't even begin to describe how much quicker and easier this is than trying to match up tiny bulls eyes or little dots like some other PDFs utilize. Anyways enough gushing about the pattern. I actually have gone on and on so it would seem.
So let's get down to the nitty gritty. It turns out I am sort of a weird combo of sizes. I should have "frankenpatterned" (she explains how), but I didn't. I should've made a muslin, but I didn't. I should've, maybe once, in the sewing of the dress, glanced at the instructions and not gone off memory from when I had taken a brief look at them a few weeks ago, but I didn't. What I did do was sew a perfectly lovely dress for someone definitely not my size or shape. Thank heavens it was on the too big side of not fitting instead of the too small.
So me and my trusty sidekick the seam ripper had an epic rendezvous. Princess seams taken in, armscye reduced, zipper removed, back seam taken in to the proper width (could've avoided that one if I'd bothered to read...), side seams of the skirt portion taken in, taken in again, - what the heck... where did the saddlebags come from??? - and taken in a final time. Done!
The dress is on the roomy side still, but it's a comfy roomy not a "who's dress did you borrow because it totally doesn't fit you" roomy. I can definitely live with it and it will be perfect for those hot humid days of summer when I just want something easy to pull on! Plus the blue birds? They just make me happy!
For a PDF pattern, you just can't beat the Sis Boom patterns. I could go on and on about them. Seriously! First off I hate having to print off a gazillion pages only to find out that for my size half of them get cut away. The beauty with Sis Boom? You're given a table that tells you exactly what pages you need for your size. And with a pattern like Rebecca that you may want to "Frankenpattern" using different sizes she breaks down the pagination for each of the components. LOVE this feature!!!!!
And I may have grumbled, muttered, cursed on more than one occasion about my dislike of the pasting together and cutting of pattern pieces. But let me tell you, these are the stuff pattern putting together dreams are made of. It doesn't matter if preschoolers have "helped" by rearranging my pages from one end of the house to the other. I can easily tell which piece belongs where with the shaded sections that clearly not only tell me what they should be joined to but show exactly how much they should overlap each other. I can't even begin to describe how much quicker and easier this is than trying to match up tiny bulls eyes or little dots like some other PDFs utilize. Anyways enough gushing about the pattern. I actually have gone on and on so it would seem.
So let's get down to the nitty gritty. It turns out I am sort of a weird combo of sizes. I should have "frankenpatterned" (she explains how), but I didn't. I should've made a muslin, but I didn't. I should've, maybe once, in the sewing of the dress, glanced at the instructions and not gone off memory from when I had taken a brief look at them a few weeks ago, but I didn't. What I did do was sew a perfectly lovely dress for someone definitely not my size or shape. Thank heavens it was on the too big side of not fitting instead of the too small.
So me and my trusty sidekick the seam ripper had an epic rendezvous. Princess seams taken in, armscye reduced, zipper removed, back seam taken in to the proper width (could've avoided that one if I'd bothered to read...), side seams of the skirt portion taken in, taken in again, - what the heck... where did the saddlebags come from??? - and taken in a final time. Done!
The dress is on the roomy side still, but it's a comfy roomy not a "who's dress did you borrow because it totally doesn't fit you" roomy. I can definitely live with it and it will be perfect for those hot humid days of summer when I just want something easy to pull on! Plus the blue birds? They just make me happy!
Thursday, November 14, 2013
This Bag's Got Bling
A few weeks ago I got an email from Anna over at Charmed Liebling. I'm always excited to see a message from her appear in my inbox. It means she's been pattern making again and needs testers. I really do love testing for Anna! She's great to work with and has fantastic designs!
This time was no different! As soon as I saw the bag I knew I would say yes, even though this time of year I'm up to my eyeballs in crafting for the holidays. But I even knew exactly what fabric combo I wanted to use, and had almost everything in my stash already. Fate, it was, I tell you. Fate.
The bag went together really quickly despite all the extra details. I love that it has so many pockets both inside and out! My favourites though are the V-shaped front slip pocket and the elasticized pocket on the inside.
My biggest challenge proved to be the rivets. Not the application of them, but the procuring of them. Agh. So frustrating! As per usual my tiny shop in town had nothing. The fabric store chain in the city had a pitiful selection, not too mention they sell a few packets of rivets but not the tools you need to apply them. Did I mention it was frustrating?
At that point, since I was on a deadline, I chose the ones I thought might work the best. I really wanted plain silver, but none were to be had so my bag's got bling. Sparkly red crystal rivets - the choices were purple, green or red. I thought the red the best option. To apply them I used a combination of my eyelet pliers, an old drum practice pad from when I was learning drumming in 402 Squadron's Pipe and Drum band back as a teenager in the mid-eighties (using it to apply the rivets was probably the most productive use it's ever seen - goodness knows the drum lessons weren't successful!), and random bits and bobs from old eyelet and snap sets until I found one that worked. After consulting with Janelle of Emmaline Bags I now know that the next time I want rivets I'll go directly to Tandy Leather in the city, they even do online sales! But I was short on time. I should have talked to her first!
My other frustration with my bag was my fabric choice. Velvet and I have never been fond of each other, especially after the tailored velvet highland dance jacket incident of 2009, which saw me, nine months pregnant, sobbing at my machine, coming well and truly unhinged while trying to make a perfectly fitting jacket for G to wear while competing in Canadians a week later - she ended up wearing her old jacket and a borrowed kilt. That particular beast that sent me over the edge is still at the bottom of my bin of "fancy" fabric. But I digress. Suffice it to say velvet is not usually a fabric choice I make willingly. My other problem was that my wool blend has a bit of stretch to it. Gah!!!! Not a fun combination, although I like the end result. So all's well that ends well.
Anyways, here's my sophisticated wool blend and velvet bag with bling! Perfect for a night out on the town... Or at least I imagine it would be. With (BF)G's work schedule and the little boys, we're not really night out on the town people. We tend more to the hermit/homebody type truth be told, but should the occasion arise down the road! I will have just the handbag for it!
If you'd like to make yourself an All Day Out Bag, hop on over to Anna's site, Charmed Liebling. You can purchase the pattern and read more about her design on her blog!
This time was no different! As soon as I saw the bag I knew I would say yes, even though this time of year I'm up to my eyeballs in crafting for the holidays. But I even knew exactly what fabric combo I wanted to use, and had almost everything in my stash already. Fate, it was, I tell you. Fate.
The bag went together really quickly despite all the extra details. I love that it has so many pockets both inside and out! My favourites though are the V-shaped front slip pocket and the elasticized pocket on the inside.
My biggest challenge proved to be the rivets. Not the application of them, but the procuring of them. Agh. So frustrating! As per usual my tiny shop in town had nothing. The fabric store chain in the city had a pitiful selection, not too mention they sell a few packets of rivets but not the tools you need to apply them. Did I mention it was frustrating?
At that point, since I was on a deadline, I chose the ones I thought might work the best. I really wanted plain silver, but none were to be had so my bag's got bling. Sparkly red crystal rivets - the choices were purple, green or red. I thought the red the best option. To apply them I used a combination of my eyelet pliers, an old drum practice pad from when I was learning drumming in 402 Squadron's Pipe and Drum band back as a teenager in the mid-eighties (using it to apply the rivets was probably the most productive use it's ever seen - goodness knows the drum lessons weren't successful!), and random bits and bobs from old eyelet and snap sets until I found one that worked. After consulting with Janelle of Emmaline Bags I now know that the next time I want rivets I'll go directly to Tandy Leather in the city, they even do online sales! But I was short on time. I should have talked to her first!
My other frustration with my bag was my fabric choice. Velvet and I have never been fond of each other, especially after the tailored velvet highland dance jacket incident of 2009, which saw me, nine months pregnant, sobbing at my machine, coming well and truly unhinged while trying to make a perfectly fitting jacket for G to wear while competing in Canadians a week later - she ended up wearing her old jacket and a borrowed kilt. That particular beast that sent me over the edge is still at the bottom of my bin of "fancy" fabric. But I digress. Suffice it to say velvet is not usually a fabric choice I make willingly. My other problem was that my wool blend has a bit of stretch to it. Gah!!!! Not a fun combination, although I like the end result. So all's well that ends well.
Anyways, here's my sophisticated wool blend and velvet bag with bling! Perfect for a night out on the town... Or at least I imagine it would be. With (BF)G's work schedule and the little boys, we're not really night out on the town people. We tend more to the hermit/homebody type truth be told, but should the occasion arise down the road! I will have just the handbag for it!
![]() |
| Front view - I LOVE that V slip pocket! |
![]() |
| Back View - Another pocket! |
![]() |
| Inside view - look at all those pockets in there! |
![]() |
| Told you my bag has bling! |
If you'd like to make yourself an All Day Out Bag, hop on over to Anna's site, Charmed Liebling. You can purchase the pattern and read more about her design on her blog!
Labels:
All Day Out Bag,
Charmed Liebling,
review,
sewing
Saturday, November 02, 2013
The Dog Ate My Wallet...
Really. She did. Actually it was a few years ago now that she chewed the corner off of it and it's been a source of embarrassment since. Nothing says classy like a wallet with a big bite out of it. Good grief!
I've been looking for a replacement for a long time, but never found one in the stores that I liked enough. So then last year I started looking at patterns and tutorials, but I always found something I didn't quite like about them. Fast forward to a little while ago when I found the Necessary Clutch Wallet from Emmaline Bags. I was completely taken with it. Roomy, oodles of spots to put things and it looks darn good as well. I was sold.
It's taken me a little while to sew, mostly because I had to make the boys' knapsacks, my swap gift and the Halloween costumes. It was also a bit daunting to tell you the truth, only because I've never made anything quite like it yet.
The instructions that Janelle provides with the pattern are excellent though. Clear as can be, lots of photos, and really thorough. I was quite impressed. I had cut out one set of fabric for it, but then going through my cottons fabric bin one night in search of something totally unrelated I came across the left over fabric from my Working Girl Laptop Bag and knew I really wanted to make a black and white wallet instead.
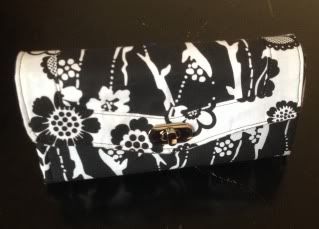
I started out one evening with great gusto. Well, that is until I got to step three where I had to put the locking clasp in. Eeek! Somehow it was more stressful than the one I did on my laptop bag. I think the instructions should come with the first step of having a stiff drink! Cutting holes in fabric, fumbling with teeny tiny screws that are nearly impossible to find when they fall under the sewing desk, glue running everywhere... Yikes! But I had my trusty assistant Fluffy the kitten to cheer me on in his own special way of climbing on my head or sitting right on top of it all. Maybe stiff drink should also be the final step of that part too. In the end I managed to conquer the locking clasp and oh what a beauty it is. The screw in plate, despite all my trials and tribulations, makes such a nice professional looking finish.
I had a few moments of frustration along the way, but nothing to do with the pattern. I tried several times to put in the card slot section of the wallet. My BFF the stitch ripper was my constant companion. After several tries I gave up. There's only so much I can take in one sitting. After I felt a little less like tossing the whole thing out the window, it occurred to me that maybe I should double check my measurements. Guess what?!? Even though I use a rotary cutter, ruler and mat with grid lines I had somehow cut the whole piece almost a quarter of an inch too narrow. The mind... It boggles. I cut a new set of pieces and lo and behold, problem solved.
I finished my wallet yesterday afternoon and I LOVE it! I transferred everything over from the overstuffed, chewed up one to my brand spanking new Necessary Clutch and would you believe I have tons of room left in it? It's kind of like Mary Poppins' carpet bag. It doesn't look overly huge until the lamp gets pulled from it. I won't likely carry that much in it, but nice to know I could easily stash my phone right in my clutch wallet if I wanted to! I just can't say enough good things about the Necessary Clutch Wallet pattern.
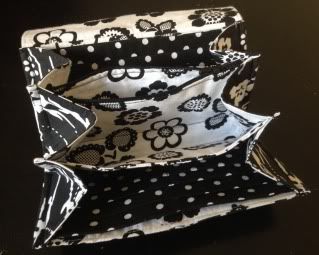
See, what did I tell you?! Look at all that room! There's a slip pocket on either side of each card slot section - which, by the way, has a total of twelve slots - then there's the zip pocket you can see there with the zip opened to give you an idea of size, and lastly a section in the middle that is roomy enough for my cel phone! But even with all that room inside it all compacts nicely into an "easy to pop into your purse" size!
I wonder how many wallets a girl can have? I'm already thinking about that other one that's already cut out...
I've been looking for a replacement for a long time, but never found one in the stores that I liked enough. So then last year I started looking at patterns and tutorials, but I always found something I didn't quite like about them. Fast forward to a little while ago when I found the Necessary Clutch Wallet from Emmaline Bags. I was completely taken with it. Roomy, oodles of spots to put things and it looks darn good as well. I was sold.
It's taken me a little while to sew, mostly because I had to make the boys' knapsacks, my swap gift and the Halloween costumes. It was also a bit daunting to tell you the truth, only because I've never made anything quite like it yet.
The instructions that Janelle provides with the pattern are excellent though. Clear as can be, lots of photos, and really thorough. I was quite impressed. I had cut out one set of fabric for it, but then going through my cottons fabric bin one night in search of something totally unrelated I came across the left over fabric from my Working Girl Laptop Bag and knew I really wanted to make a black and white wallet instead.
I started out one evening with great gusto. Well, that is until I got to step three where I had to put the locking clasp in. Eeek! Somehow it was more stressful than the one I did on my laptop bag. I think the instructions should come with the first step of having a stiff drink! Cutting holes in fabric, fumbling with teeny tiny screws that are nearly impossible to find when they fall under the sewing desk, glue running everywhere... Yikes! But I had my trusty assistant Fluffy the kitten to cheer me on in his own special way of climbing on my head or sitting right on top of it all. Maybe stiff drink should also be the final step of that part too. In the end I managed to conquer the locking clasp and oh what a beauty it is. The screw in plate, despite all my trials and tribulations, makes such a nice professional looking finish.
![]() |
| Look at that locking clasp looking all innocent and not at all like it almost drove me to drink! |
I finished my wallet yesterday afternoon and I LOVE it! I transferred everything over from the overstuffed, chewed up one to my brand spanking new Necessary Clutch and would you believe I have tons of room left in it? It's kind of like Mary Poppins' carpet bag. It doesn't look overly huge until the lamp gets pulled from it. I won't likely carry that much in it, but nice to know I could easily stash my phone right in my clutch wallet if I wanted to! I just can't say enough good things about the Necessary Clutch Wallet pattern.
![]() |
| The Mary Poppins carpet bag of wallets!! |
![]() |
| The Necessary Clutch Wallet |
Labels:
Emmaline Bags,
Necessary Clutch,
Purse Palooza,
review,
sewing
Tuesday, July 30, 2013
A Honey of a Blouse
I mentioned in my last post that I did finish the Honey Blouse from Make it Perfect. I fell in love with the pattern a few months ago when I had stumbled across it on another sewing blog. It looked like it would be just the kind of top I could easily live in. I ordered it from Pink Chalk straight away and then started my search for fabric. With (BF)G's help, I finally settled on a cotton lawn with a bright and abstract print on white background that I found at Fabric.com. Once pattern and fabric had both arrived I was so excited to dive right into sewing... and then I read some reviews of the pattern that weren't really enticing, but still I thought, can't be that bad and I really loved the look of it, so I opened the pattern up, ready to trace and set to work and understood the basis for the unfavourable reviews.
For a full priced pattern there's a lot of work to be done. Pattern pieces that need to be traced together are printed back to back on smaller paper and then there are several pieces that need to be just cut to measurements with no pattern piece at all. I can understand that it cuts back on printing for the publisher of the pattern, but at $12, I expected a little more. I tossed the instructions aside after about the first sentence as they just weren't reading well to me - although that could just be me being finicky. I have to say in all honesty I really did not enjoy the making of this pattern. From start to finish I was annoyed with it.
My whole disgruntlement could really just be me. After sewing my Jamie Dress and thoroughly loving the whole process of it, maybe my expectations were just simply set too high. The Sis Boom pattern, as you may recall, went together like a dream. The instructions were clear and thorough not too mention intuitive. I just wasn't getting that feeling from the Honey Blouse.
Despite the annoyance with the pattern, I am really happy to say I did end up with a blouse I love. It's comfortable, fits pretty well (although a touch roomy in the hips) and I have worn it several times. Definitely worth the frustrations I had making it. I can truly say I love my Honey Blouse now that it's finished and I'm so glad I persevered!!
(photos once again curtesy of Little Man)
Up next in sewing I have a little project to finish for someone, then possibly another warm weather top for myself and a new pair of warm weather pj pants for (BF)G. After that it may have to be another set of jammies for the little boys because I'm getting tired of having to wash the digger ones every second day. (That's all they want to wear and oh the anguish when they need to be washed as you know, clothes sometimes do...). In between that the Christmas knitting continues as does work on my Miette Cardi.
For a full priced pattern there's a lot of work to be done. Pattern pieces that need to be traced together are printed back to back on smaller paper and then there are several pieces that need to be just cut to measurements with no pattern piece at all. I can understand that it cuts back on printing for the publisher of the pattern, but at $12, I expected a little more. I tossed the instructions aside after about the first sentence as they just weren't reading well to me - although that could just be me being finicky. I have to say in all honesty I really did not enjoy the making of this pattern. From start to finish I was annoyed with it.
My whole disgruntlement could really just be me. After sewing my Jamie Dress and thoroughly loving the whole process of it, maybe my expectations were just simply set too high. The Sis Boom pattern, as you may recall, went together like a dream. The instructions were clear and thorough not too mention intuitive. I just wasn't getting that feeling from the Honey Blouse.
Despite the annoyance with the pattern, I am really happy to say I did end up with a blouse I love. It's comfortable, fits pretty well (although a touch roomy in the hips) and I have worn it several times. Definitely worth the frustrations I had making it. I can truly say I love my Honey Blouse now that it's finished and I'm so glad I persevered!!
(photos once again curtesy of Little Man)
Up next in sewing I have a little project to finish for someone, then possibly another warm weather top for myself and a new pair of warm weather pj pants for (BF)G. After that it may have to be another set of jammies for the little boys because I'm getting tired of having to wash the digger ones every second day. (That's all they want to wear and oh the anguish when they need to be washed as you know, clothes sometimes do...). In between that the Christmas knitting continues as does work on my Miette Cardi.
Subscribe to:
Posts (Atom)