Tuesday, May 21, 2013

Channel Your Inner Elvis

I spent half of last week thinking about cupcakes. Not just any cupcakes. Chocolate cupcakes. Chocolate cupcakes kicked up a notch. Chocolate cupcakes involving bananas. And peanut butter... (sometimes my mind has a lot of time on it's hands apparently)

This weekend that vision became a reality.

I started out with my usual chocolate cake recipe, but changed it up a teensy, tiny bit. Then I made my usual chocolate buttercream, but changed it up a bit too.

Success. Sweet, sweet success!!!!

Photobucket Pictures, Images and Photos
Mmmmmmmmmmmmm

Are you thinking about cupcakes now? Here's the recipe if the little voice in your head is now telling you that you need to channel your inner Elvis and dine on some chocolate banana cupcakes with chocolate peanut butter frosting.

CHOCOLATE BANANA CUPCAKES SUPREME

2 cups flour
1 2/3 cups white sugar
3/4 cup butter or margarine
1 tsp salt
2/3 cup cocoa
1 1/3 cup milk
1 1/2 tsp baking soda
1/2 tsp baking powder
2 eggs
3/4 cup mashed ripe banana
1 tsp vanilla


Pre-heat oven to 350F (170C)

Combine all ingredients into mixing bowl, beat with mixer on medium speed for two minutes until creamy then divide into muffin tins lined with cupcake liners. Bake for approx. 20 minutes

When cool finish off with the pièce de résistance - chocolate peanut butter buttercream (unless of course you are serving these to anyone who may have a nut allergy. Just stick with chocolate instead. It'll still be great. I promise. After all cupcakes should be enjoyed happily and safely by all)

Chocolate Peanut Butter Buttercream

1/2 cup shortening
1/2 cup butter or margarine
3 TBSP peanut butter
1 tsp vanilla
2-4 TBSP milk
4 cups icing (confectioner's) sugar
1/3 cup cocoa powder

Mix all with hand mixer until creamy and smooth.

Enjoy!!!!

Thursday, May 16, 2013

Bath Time for A Little Friend

The other night Baby Boy's Flannel Friend was the unfortunate victim of a wardrobe malfunction that left Baby Boy, his bedding and his flannel friend soaked. That's the last time I buy a brand of disposable pull ups just because they're on sale so much cheaper than our usual brand. Apparently there's a reason they're so much cheaper! Nothing like a late night complete change for a sad and soggy toddler.

Anyways, poor Flannel Friend needed a bath in a big way! Surface washing was not going to even come close to fixing what ailed this little guy. So yesterday he got one. You can't just throw them in the washing machine and dryer, they need a bit more special treatment than that given they are stuffed with 100% wool. Felting the stuffing would lead to a very sorry looking (and feeling)friend. So here's how we do it here at our house in three easy little steps.

1) I filled the kitchen sink with lukewarm water and added some detergent - use whatever you like as long as it's not too harsh, what you would hand wash your wool sweaters in is fine. (ahem, confession time... I used a squirt of Dawn dish soap)

2)Then Baby Boy's little friend was placed in the soapy water and gently swished about. You don't want to be too vigorous with your swishing because too much agitation can cause the wool stuffing inside to felt and get lumpy.

Photobucket Pictures, Images and Photos
Rub a dub dub, Flannel Friend's in the tub

3)Once you feel bath time has been long enough, you need to rinse well to get all traces of soap out. To do this I ran clear water over him, gently squeezing as I went until the water ran clear with no bubbles. Then he went outside to the deck to sunbathe (more commonly known as air dry).

Photobucket Pictures, Images and Photos
Basking in the sunshine

And there you have it! Easy as one, two, three.

A fresh, clean, smells much better than it did friend all ready for bedtime snuggles again!

By the way, if anyone is interested in ordering a Flannel Friend for themselves or a little person they know, please don't hesitate to contact me and we can discuss details. I am always happy to do custom orders and turn around time is about a week or less (not including the time it takes to ship through the post)

Friday, May 10, 2013

Drumroll Please...

So here we are, Friday night and Giveaway Day is done.

I have had so much fun reading everyone's comments this week. It's been great hearing what your favourite childhood toys were. A common thread for many of you seemed to be that your favourite was something a loved one had made for you.

Reading all your comments inspired me to venture into the deepest darkest reaches of the storage area under our basement stairs to find my very own favourite childhood toy, Pinky.

Finding her wasn't easy... Let's just say I know what spring cleaning chore should be at the top of my list!!! Happily, though eventually I found her. She looks a little worse for wear, ok. I'll admit it. She looks a whole lot worse for wear, but let me tell you she saw a whole lot of love in her prime.

My Mom made her for me for Christmas - I think when I was a year and a half old (so she's about 40 years old now!) She was my comfort, my companion, my very best friend when I was little. I loved her so much I loved her face right off and Mom had to re-embroider it on. I can still remember the horror of realizing I'd forgotten Pinky in my cubbyhole one day in Kindergarten. I was certain tragedy would befall her overnight. Funny how some memories stick with you like that.

Pinky's not much to look at now in her stained, threadbare condition, face and hair mostly gone, but finding her this afternoon brought back such happy childhood memories.

Unfortunately I couldn't find a photo of Pinky in her newer days - I assure you she was as pretty a doll as ever was made with her bright yellow yarn hair, blue eyes and rosy pink body - but I thought I'd show you her in her well loved state.

Photobucket Pictures, Images and Photos
A very well loved Pinky

Anyways, before I ramble on much longer, I'm sure you're all waiting to hear who has won the little Flannel Friend!

I had started out thinking I'd write everyone's name on a scrap of paper, throw them in a hat and have the boys pick one, but it was getting close to bedtime, the boys were getting tired and I figured it may somehow dissolve into a meltdown, so I tossed that idea out the window and used modern technology instead. I googled "random number picker" and clicked on through to the first hit.

Voila. Drumroll please...

Photobucket Pictures, Images and Photos
We have a winner!

The winner is commenter number 27!

Kelly said,

Oh my word! That doll is so sweet! My favorite toy growing up was probably the doll my mother made for me. I named her Deborah and dressed her in my baby sister's cast-offs. :-)


Congratulations Kelly! I'll be sending you an email shortly so that your Flannel Friend can go out in Monday's post!

Thank you everyone for participating and thank you very much for all your kind words about my doll!

Wednesday, May 08, 2013

Here We Go a Washi-ing...

I finally buckled down to making my Washi tunic last week. I don't know what it is about cutting out and piecing together PDF patterns that causes me to procrastinate so much. Especially when it's a pattern I really, really do want to make!

Photobucket Pictures, Images and Photos
Washi Dress and Tunic
I'm a bit late to the party. I've wanted the Washi Dress and Tunic pattern from Made by Rae ever since she released it in 2012. I wasn't sure though - it looks great on Rae, but I am not shaped anything like Rae, so I was kind of worried it would end up looking maternity-ish on me and the last thing my mental health and well being needs is to be asked when I'm due. So I put it off waiting to see what it looked like on others first. Months and probably a hundred blog posts and reviews read later, I decided to go for it!

I'm glad I did! It's a great pattern and the final result is cool and comfy! I guarantee it's going to be getting a lot of wear this summer!! I like the way the shirring along the back snugs everything in. In terms of instructions, they're really thorough, and if I'd read them before starting the pattern instead of after I was finished I probably would have put the pleats the right direction, facing in instead of out. Oh well. Next time. (and there will be a next time...).

Photobucket Pictures, Images and Photos
Washi take one!

I did do two muslins of the bodice first to get a fit that was just right for me. In the end I just needed a wee bit more length in the bodice. Probably not entirely necessary, but I like my empire waists to be a touch lower than what most patterns accommodate.

I love the fabric I chose for it. I've wanted this fabric forever too! It's Michael Miller Sanctuary Orchid Feng Shui that I purchased from Sew What Fabrics in Alberta.

Photobucket Pictures, Images and Photos
Cool as a cucumber in my Washi... Partly because it was about +6C when this pic was taken

Next on my to do list of sewing for me is my Jamie Dress! I just need to wait until I can get to the city for some lining fabric and a zipper. I'm also waiting for my Honey Blouse pattern to arrive in the post!


Tuesday, May 07, 2013

I'm Late! I'm Late for a Very Important Date!

There is a certain greatness to my lateness.

http://sewmamasew.com/Somehow until late, late last night it escaped my attention that the Sew, Mama, Sew! Giveaway Day (which is actually running all week until Friday) was starting. Sorry about that!!

Last summer I took a notion into my head that the Baby Boy and Little Toddler man needed a special little companion and set to work making them each a regular sized Waldorf-inspired doll. I was hooked on the doll making. So at Christmas time I made a little flannel friend for our great niece, and suddenly found myself even more hooked! Making them for the boys, and some friends' babies, these little babies were so much fun!

I love the feel of the wool roving I use to make the inner head, it's so soft and fluffy, but quickly becomes a cohesive firm ball with a wee bit of coaxing (and now the aid of a felting needle. I love using a felting needle, especially now that I've stopped inadvertently stabbing myself with it - that was a bit of a steep and painful learning curve! Ha ha!). It seems sort of like magic the way it comes together. Then the outer head goes on, the little body that gets lightly stuffed and then the best part of all - the finishing touches! The hat and sometimes "hair", a jaunty little ribbon bow (that was (BF)G's idea!), and the embroidered face. I adore these little "flannel friends".

They are just the right size for little hands to hold and carry easily. They fit perfectly into your purse or diaper bag for outings. And they make a good bedtime companion as Baby Boy could attest too - he was clutching his in his chubby little toddler fingers as he fell asleep last night.


So now for the nitty gritty of it all! How would you like a flannel friend for a little someone you know?

Photobucket Pictures, Images and Photos
Little Flannel Friend

I'm giving away a handmade flannel friend here on the blog! The flannel friend is approximately 8" tall from bottom to head (not including the hat) and is made with pure wool roving stuffing, cotton interlock and cotton flannel. Flannel friends are best surface washed with gentle soap, but if more thorough cleaning is needed you can give it a "bath" in the sink by hand like you would your favourite hand knit sweater and let it air dry.

The contest is open from today until 5pm (PST), Friday, May 10, 2013. To win please leave a comment letting me know what your favourite toy was as a child (and your email address so I can contact you if you win). Winner will be chosen randomly from all entries. Contest is open to all readers, but one entry per person please! Good luck!

When you're done here you should head back on over to Sew, Mam, Sew! To check out all the other amazing giveaways going on this week!!!

Wednesday, May 01, 2013

When Life Gives You Lemons Make Pajamas... And a Cowl

I thought I would stop in and catch up with a quick post today!

As I mentioned in my last post I had quite a few projects on the go.  The Simplicity blouse turned out a disaster. Instead of an airy summer blouse I realized what I had was an airy summer pajama top. But when life hands you lemons (or in this case an err in judgement when choosing fabric) you make lemon aid.  Or pajama bottoms. I made the bottoms. They're simple cotton capris length with inseam pockets and a contrast band at the bottom to match the top.  I also added some shirring at the bottom of the top to practice for my upcoming Washi tunic.

Photobucket Pictures, Images and Photos
Pjs - unmodeled because posting a pic of my self in my jammies is just too weird

A quick word about shirring.  Save yourself a whole lot of anxiety, hair pulling and gnashing of teeth. Go buy Gutterman elastic thread before you begin. Heed my advice. I have learned the hard way.

So blouse/pajamas aside I've been motoring along on my knitting. My vest is currently in time out for bad behaviour, my Augusta Cardi is coming along quite nicely, I'm 11 1/2" into my Gemini (and nervously playing yardage chicken with yarn that is so full of knots that I'm quite certain is losing me precious yards with each ball) and my Amerind Cowl is finished!

I knit Amerind for the Sexy Knitter KAL. I have known of designer Sarah Wilson for years (I've had her Stargazer printed off since forever!). A few months ago she came back on my radar when she had a pattern giveaway on Ravelry. I ended up with my freebie and then bought two more of her patterns with the coupon code she offered along with the free pattern.

She has some stunning patterns and a great philosophy on women and self image. I highly recommend checking her site and group out.  I finally decided to join her group, then I saw she was hosting a knit along. My yarn had just come in from Little Knits so I cast on right then.  I really enjoyed the pattern. It was simple enough that I could easily keep track, but interesting enough to keep me going. I even learned another new trick! I have shied away from provisional cast ons in the past because the instructions left me confused, but this one, Judy's Magic Cast On, is so easy to learn!

Photobucket Pictures, Images and Photos
Amerind Cowl

The yarn is the now discontinued Queensland Collection Kathmandu Aran, which is a merino, silk, cashmere blend. As I mentioned, I ordered it from Little Knits. It was a ridiculously inexpensive price and the colour jumped off the screen at me. I knew I wanted it for my cowl.  After ordering I checked out the comments on Ravelry and was dismayed that there were so many negative reviews of it.  I consoled myself that at least it hadn't been expensive.  But then I got my yarn and it was beautiful.  A lot of the complaints were that it was too rustic - scratchy and full of vegetable matter. What I experienced was  quite the opposite, luxurious colour, with a soft hand, no veggie matter at all and great stitch definition.  I wish I'd ordered more.

I really love my cowl. And if this darn chilly weather doesn't head on out I may be getting some use of it over the next few days!

Photobucket Pictures, Images and Photos
So cozy!


Saturday, April 13, 2013

Mine All Mine!

The majority of my crafty persuits are usually for other people. Don't get me wrong, I do love giving handmade creations to others, it's actually one of my favourite things. But occassionally a gal wants to have something new for herself. So I'm taking a bit of a time out from other projects for some "selfish knitting and sewing" that will be mine all mine!

Photobucket Pictures, Images and PhotosI have been wanting to make a new purse for awhile and had planned on a spring/summer one, but when I woke up the other morning to -15C and more snow falling I said to heck with spring. I need a new winter purse. I was given Sew Serendipity Bags by Kay Whitt for Christmas and have had my eye on a few of the projects from the moment I opened the book. I decided the perfect bag for right now would be her Tulip Tote. Roomy, yet feminine. Just what I wanted. I dug through my fabric stash bins until I found what I wanted - some yardage of wool/poly blend suiting, a piece of leftover taffeta from a long ago project, a leftover strip of quilt batting that was just the right size. The only thing I had to purchase was drapery grommets, which the little fabric store in our nearby town surprisingly carry!

I love how the bag went together, first quilting the suiting then cutting out the pattern pieces and the bottom corners were so much easier than the way patterns normally would have you do them which usually leads to a whole lot of muttering and seam ripper usage as I can never get that "dog eared" fold to line up the seams properly the first time. This pattern instructs you to cut out a square first. Brilliant! You can see exactly what your seam is doing that way.

This project did take me a lot longer than it should have to complete, but that was mostly due to trying to sew while the boys were up and about. Minor crises such as a tumble off the piano, a sewing machine (and toddler) having a near miss fall to the floor, thread being tangled from my serger all around the room and the like hindered progress significantly. Despite all the mayhem after a few days my bag was sewn. I love it, but thought it looked a little ho hum on it's own. I was going to add a frayed fabric rosette, but really couldn't decide what fabric to use. I also couldn't find the online tutorial I had in mind, so I went a different route. I found the Sweet & Simple Rosette pattern on Ravelry and knit one. I'm really excited about the end result!

Photobucket Pictures, Images and Photos
A project that incorporates three of my favourite things! Knitting, quilting and sewing!!

Photobucket Pictures, Images and Photos
Close up of the rosette - I especially love how the random button I found in my button tin has a diamond pattern on it that matches the quilting!

Photobucket Pictures, Images and PhotosAfter the Tulip Tote success, I decided to dive into a summer top for myself on the off chance Mother Nature doesn't forget entirely about spring and summer this year. I pulled out a length of cotton and Simplicity 2892. I figured I would do view D or E. Not having enough fabric to cut both front and back out on the fold I thought, "ha! I laugh in the face of not enough yardage!" and feeling rather smug I cut out the back adding a 1/2" seam allowance down the centre instead of cutting on the fold. My smug sense of genius lasted until the point halfway through sewing the blouse I realized I'd not cut out the back that way, but rather the front. Sigh. There went that idea. I'm partway through sewing attempt number two. We'll see how it goes without having a seam down centre front. Yeesh. Yes, folks. I am a trained professional. Somewhere I have a piece of paper that says so. You just sometimes wouldn't know I spent three years learning how to do this thing called sewing. Ha ha!

I have lots of plans for a wardrobe for our yet unseen spring. If I ever finish the Simplicity blouse, I will move onto the ever popular Washi Dress and Tunic from Made by Rae

Photobucket Pictures, Images and Photos
My Washi fabric!

I also have plans for a Jamie Dress from Sis Boom.

Photobucket Pictures, Images and Photos
My Jamie fabric!

I also am knitting the Augusta Cardigan, Montague Vest, Amerind Cowl and planning to cast on Gemini in a about a week and a half for the Luvinthemommyhood KAL. We'll see how well I do...

Friday, April 05, 2013

A Bit of This And That - A Round Up

Over the last few posts I've showed you a couple of bigger projects - the Storm Fir Shawl and the collection of Hotshots - but over the last month and a half I've been doing some smaller scale projects as well. I thought I'd take a minute to show them to you today.

It seems like the baby boom never ends. So I've been busily crafting for babies to be and babies already born.

This little set of flannel swaddler and Tiny Topper's Cable Tie Topper was made for my great nephew (who, incidentally was just born yesterday! A big congratulations to my nephew and his lovely wife and a warm welcome to the world little man to my great nephew!!) I was worried it might be too warm of a set by the time he was born, but it's still pretty wintery here on the prairies so hopefully it's useful!

Photobucket Pictures, Images and Photos
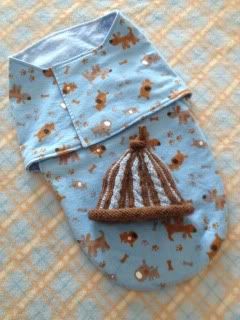
Such a fun little set to make!

Next on the baby gift list was a little romper for my friend's not so new arrival (he was born quite a few weeks ago). It's the Austin Lee Romper from Fishsticks Designs, which is a great blank slate type of pattern that can be customized in so may ways! I really love this pattern (although it didn't love me. My stitch ripper got quite a workout. Not sure why. Usually it goes together with no trouble at all)

Photobucket Pictures, Images and Photos
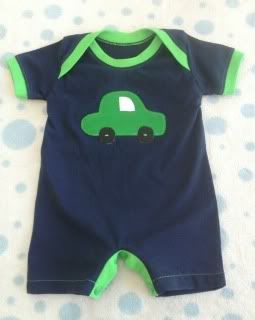
Handpainted stencil appliqué makes it easy to create a unique gift!

Then for another friend's baby who was born in the fall (I really am behind on the gift making!!) I knit a pair of baby monkey socks. The real Monkey by Cookie A. are one of my favourite patterns to knit, so I thought what better than a baby sized pair. They did not disappoint and were a pleasure to knit!
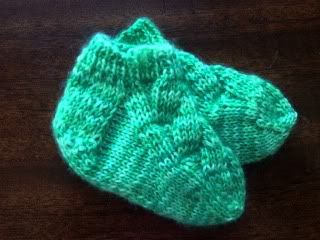
Photobucket Pictures, Images and Photos
Teeny tiny socks!

Next up for another new baby I knit another favourite pattern. It's a similar look to the popular Upside Down Daisy hat, but I find the construction of the leaves and stem a bit easier for me on the Berry Baby Hat. I knit it in cotton so the little one can hopefully use it as a spring hat.

Photobucket Pictures, Images and Photos
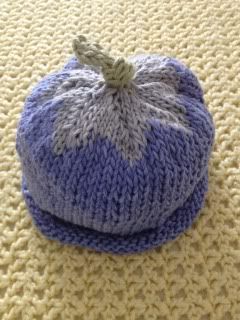
A little cotton flower.

Last but not least in the baby gift list (for now... The next wave starts in May) is another favourite of mine, the Charlie Hoodie also by Fishsticks Designs.

Photobucket Pictures, Images and Photos
Cuddly, cozy fleece

Non baby crafting was happening as well! Little Toddler Man had his ice show in mid March to showcase all they had learned at skating lessons throughout the winter. He needed a pirate costume so I whipped one up out of old fabric I had in my stash. But then my friend Stacy mused that a parrot would really top it off. Of course I latched onto that like a dog with a bone. Three days before the ice show I cast on. LTM was ecstatic!

Photobucket Pictures, Images and Photos
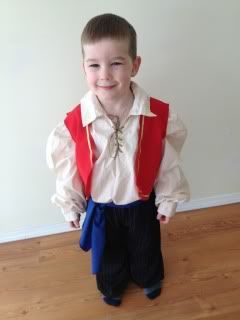
The costume - using N's old "kilt shirt".
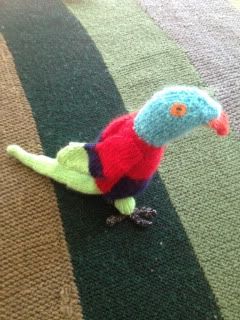
Photobucket Pictures, Images and Photos
The parrot!

Photobucket Pictures, Images and Photos
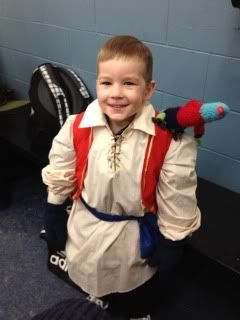
Almost ready for the show!

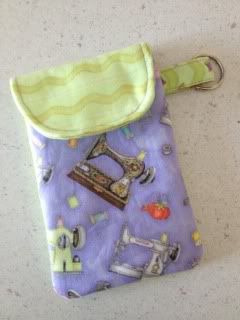
A while back I'd made a quick cel phone cover for my new phone. I used a self drafted pattern and am pretty happy with it although I'd planned on 1/2" seam allowances when I cut it out and by the time I sewed it I used 3/8" so it was a tad roomy, but it works well enough. My SIL saw mine and asked me to make her one so I used a sample fabric I'd got a couple years ago from Spoonflower and whipped up one for her. Eventually I may even remember to get it to her... It's been sitting on my dresser for about two weeks now.

Photobucket Pictures, Images and Photos
One for me!

Photobucket Pictures, Images and Photos
One to give away!

Another fun gift I made was for my friend's own little toddler man. I perused the Internet for pictures of car wallets and couldn't decide which I like the best so I made a pattern that is pretty much a mash up of all the different features I liked. I think the fact it has a little "road" is one of my favourite parts! It has room to park three Hot Wheels and velcros shut. I'm definitely going to make my little boys their own.
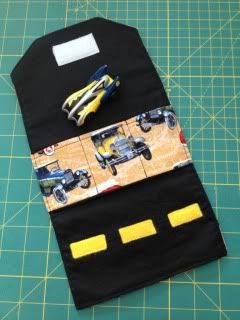
Photobucket Pictures, Images and Photos
Vvroom! Cars to go!

The very last project I want to show you is Baby Boy's apron he requested - a black and white kitty. I just made it yesterday and am really tickled that he loved it so much that he wore it all morning! It's from McCalls #6298

Photobucket Pictures, Images and Photos
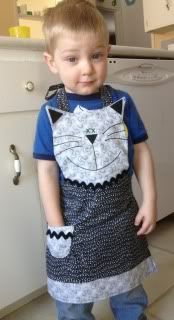
My toddler sous chef ready to work!

Phew! That was a lengthier round up than I thought. It's been a productive two months for me I guess! I hope you enjoyed seeing my latest little projects. I certainly enjoyed making them. I think I'll be shifting gears a bit now though. I'm working on a few projects for me right now that I'm pretty excited about and just signed up for Luvinthemommyhood's spring top KAL. It's going to be a busy few weeks crafting wise, but hopefully I end up with some nice new things in my wardrobe for spring and summer.


Sunday, March 31, 2013

Happy Easter!

The little boys and I have been having some Easter fun and craftiness here!

Excited that the older kids were all going to be home this weekend, the boys decided we should do something special. So in preparation the other day they helped bake some cupcakes. We channelled our inner Martha Stewart... Ok, actually we just used her recipe for yellow cupcakes. I've been in search of a good one and this is definitely good.

Photobucket Pictures, Images and Photos
Wearing bunny ears is apparently vital to cupcake baking success...

We froze the cupcakes and I took them out and decorated them Saturday afternoon while the boys were out with Daddy. Two key points in decorating: 1)frozen is a darn sight easier to decorate than barely cool from the oven and 2)decorating sans toddler help is a darn sight easier than with toddler help. I was pretty impressed with my efforts given I usually end up frustrated, covered in icing and staring at something that resembles nothing I pictured in my head. I'm calling this endeavour a success for sure!

Photobucket Pictures, Images and Photos
Bunnies and Butterflies Oh My!

The other thing the boys had fun doing preparing for THE VISIT was to make "Easter Bags" for J and N and their girlfriends and G and her boyfriend. We shopped for treats earlier in the week then worked on the bags on Friday. I made a simple template then cut out the shapes. LTM tried some cutting, but then somehow lost interest in cutting paper and started cutting his pajama pants instead (toddlers... I will never understand them.) so I took over cutting and let the boys be in charge of assembly. I think they turned out rather cute. They even have cotton ball tails on the back of the bag. I love that each bag is unique.

Photobucket Pictures, Images and Photos
Six little bunny bags all ready to go!

Our final bit of fun was to make bunny puppets! Using the same simple template I'd made for our bags, I cut out a set of shapes for each of the boys. Instead of gluing them to bags we used large craft sticks. They had a lot of fun putting them together and drawing the little details on the faces. Once the glue all dried the little puppets proved to be a lot of fun for playing with too!

Photobucket Pictures, Images and Photos
Playing with bunny!

Photobucket Pictures, Images and Photos
Bunny goes hop hop hop!

Lots of fun! Next up is waffles for brunch then start preparing for a big turkey dinner feast for tonight! I hope all of you have a wonderful day with your loved ones. Happy Easter from our home to yours!

Thursday, March 28, 2013

Some Little "Hotshots"

When I started knitting Baby Boy's Greyson in February Little Toddler Man had some serious sweater envy. So I did what any self respecting knitter would do and leapt at the chance for another project. I showed LTM a few choices and he chose Hotshot by Julia Stanfield (she designed Greyson as well!). His only stipulation was it needed to be green.

I had a few other obligations that needed finishing up first, plus a trip to the LYS in the city was required for the yarn for LTM's sweater. He waited, somewhat impatiently, imploring hopefully every time he saw me pull out my knitting bag,"Is that for my new sweater?" then would look crestfallen upon realization that no, it wasn't for his sweater.

Finally the day came that we were going to the city. A quick jaunt over to the lys and I had a very happy boy on my hands! Knitting went really quick, as always with Julia Stanfield's patterns, it was well written and easy to follow. The sweater was done in a little over a week. Big Boy Dolly's in a day. Which apparently wasn't fast enough for LTM as he would sidle past his sweater and mutter, "Looks done to me..." despite the fact I still had needles attached.

Photobucket Pictures, Images and Photos
"Looks done to me..."

I finally gave in and let him wear it before beginning the hood. Oh happy day. He was thrilled!!

Photobucket Pictures, Images and Photos
Happy as a clam in his almost finished sweater!

I actually wasn't sure I was going to get his sweater back to knit the hood, but I managed to snag it away that night and start on the hood. In my haste I made an error in my stitch count, then didn't bother with the decreases because of the mistake, then in all my wisdom added an inch in height. Oi! It's a rather large hood. I may rip it back a few inches, put those decreases in and make it a bit smaller, although I've been informed by a certain 3 1/2 year old he likes it just the way it is thank you.

Little Toddler Man and his doll's sweater were a great project for not adding to my stash. Out of two skeins of Berroco Vintage and one skein of Berroco Vintage Colors I had less than five inches of the Berroco Vintage Color left and only the trimmings off of the ends following weaving in for the green Berroco Vintage. Not bad if you ask me!!! (although somewhat hard on the nerves playing yardage chicken like that!)

Photobucket Pictures, Images and Photos
Cool little man rocking his hooded hotshot!

Photobucket Pictures, Images and Photos
Big Boy Dolly likes his too!

Once I was finished with Little Toddler Man's I moved onto Baby Boy and Baby Dolly's sweaters. I was using old stash yarn for the main colour. I do love a good stash buster and this one fit the bill. It used up the last superwash wool that I'd bought back in 1996! It was originally bought for a (yikes!!) cropped cardigan with an all over floral pattern - kind of glad I never got around to making that particular fashion disaster for myself! I think Baby Boy's Hotshot was an infinitely better use of the yarn!

I finished it late one night long after Baby Boy had gone to bed. The next morning I was excited to try it on him and snap a few photos. Unfortunately being 2 1/2, with definite opinions on what he wants to wear at a particular moment led Baby Boy to be considerably less excited about it all.

Photobucket Pictures, Images and Photos
Not too happy...

Photobucket Pictures, Images and Photos
Baby Dolly makes it only slightly better

Thankfully his opinions change with the wind and a few days later he specifically requested his new sweater!

Photobucket Pictures, Images and Photos
Little Hotshots

Wednesday, March 20, 2013

Something About Lace

Earlier this winter I decided to get away from my usual knitting projects and make myself a small shawl. I thoroughly enjoyed knitting my Lingonberry Shawlette. There is something about lace. It has caught me in it's web of yarn overs and ssk's. I've been queuing up shawl patterns at a mad rate, rifling through my yarn stash, plotting, planning.

The thing, I think, that I love most about lace is how when knitting it, it really looks like nothing spectacular. All those stitches bunched up on the needles make it hard to see any sort of pattern. Then you cast off and it looks a bit better, but still like a small, ugly duckling version of it's future self. Then you block it and it's true beauty suddenly appears.

Photobucket Pictures, Images and Photos
Fresh off the needles!

I've just finished knitting the Storm Fir Shawl pattern on Ravelry. It's a beautiful shawl, knit on 8mm needles, using bulky yarn. The pattern claims it can be knit in a day! I'm sure it could have been if I ignored such trivial things as eating, sleeping or taking care of my children, but since I'm not about to forego any of those things it took me about four or five days.

Photobucket Pictures, Images and Photos
Having a bath in some Lavender Euclan wool wash
I learned a few new tricks with this one. (I always feel so smart when I learn a new trick!) First off, this shawl was being knit for warmth and somewhat on a whim. I don't generally like to buy yarn for projects that I undertake on a whim anymore because I am fickle and my whims are sometimes short-lived. So I go "shopping" mostly in my stash, which incidentally has been largely built on long forgotten whims and generous gifts from two other knitters who possibly suffered the same fickleness as myself. Anyways, where was I? Ah. Yes. Learning new tricks!

Because I was going for warmth in my shawl (it's going to be my down in the basement shawl for when I'm sewing or watching TV) I chose a blue Alafoss Lopi I had in my stash. To join such bulky yarn in my usual way of just picking up the new strand and starting knitting with it, catching the two loose ends in for a few stitches would be pretty noticeable. Especially on a project such as this. So I decided to get over the fact I've always shied away from "spit splices" for the simple fact it sounds gross. I used to spit polish my drill boots, so really how bad could it be anyways? Turns out, upon actually learning about the technique, you don't need to spit on your yarn the way I had always imagined. Really, wetting your hands under the sink tap probably works just fine if you're opposed to licking your palms as suggested in the tip from designer, Ragga Eiríksdóttir.

Photobucket Pictures, Images and Photos
Looking much better after a bath!

So spit splice was my first new trick. The second new trick I learned was a lace cast off. Which sounds like it should be complex, but isn't and I assume it's name just refers to the fact it's suitable for casting off lace, because the cast off itself is not lacey. With my Lingonberry Shawlette all I did was go up a needle size to cast off, but it still seemed a bit too tight to me. Storm Fir directs the knitter to use a sewn bind off or other stretchy method. I really don't like doing sewn bind offs so I sought the advice of the google gods and came up with this method. It simply consists of knitting two stitches together (either through the front or back loop depending on your preference - I did through the front loop for my Storm Fir), then sliding the new stitch back on the left hand needle and knitting it and the next stitch together, repeating the process until done. So very simple and not tight in the least, but not too loose either.

Photobucket Pictures, Images and Photos
After blocking the lace pattern really pops out!

I'm really happy with my "Shawl for Warmth", but next up I think I might do a fine guage shawl again. I have some "too pretty for socks" sock yarn that is begging to be knit up as maybe a Holden Shawlette or maybe Warwick or maybe the Through The Woods Shawlette. We'll see...


Saturday, March 02, 2013

Just Around The Corner

Remember how I said I was passing time waiting to go to my LYS by trying out a new pattern idea I had? Well, I finished knitting that idea and I rather like them, so I thought I'd go ahead and share it with you!

Photobucket Pictures, Images and Photos
There may be snow on the ground right now, but spring is just around the corner!

Presenting Just Around The Corner, quick to knit ankle socks that have a sweet symmetrical design featuring a delicate mock cable and floral pattern along the side of the foot. I think they are a perfect project to work on while you plan your garden, look through seed catalogs and wait for spring that hopefully is just around the corner!

Photobucket Pictures, Images and Photos
Delicate mock cables and a floral design run down the sides.

Photobucket Pictures, Images and Photos
The rest is straight stockinette making these little socks an instant gratification kind of project!

You can go ahead and grab a copy of the pattern that my amazing friend, Jeniffer, has done up in a pretty PDF by clicking here